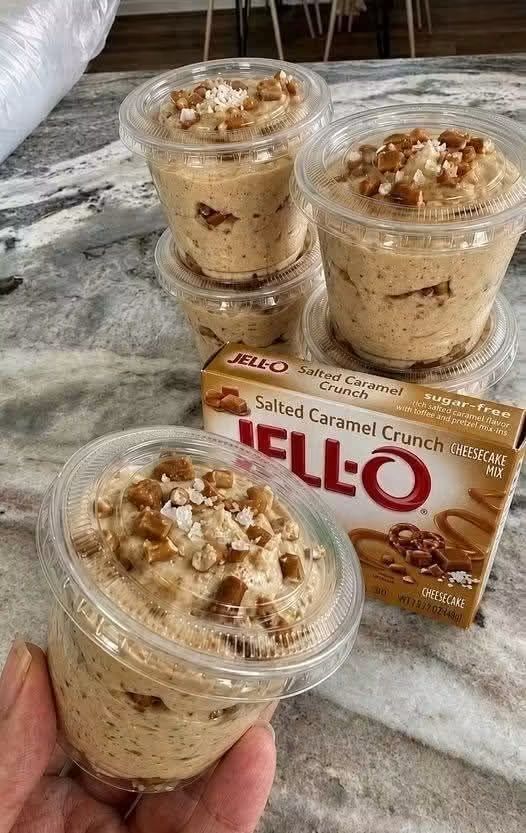
These Salted Caramel Crunch Cheesecake Cups are a creamy, no-bake dessert served in individual clear cups, just like the ones in your photo. They have a smooth salted-caramel cheesecake filling, a crunchy layer in the middle, and a delicious topping of caramel pieces and crushed nuts. They are easy to prepare, require no oven, and are perfect for parties, family gatherings, dessert tables, or selling as individual dessert cups.
The recipe below makes approximately 8–10 individual cups, depending on the size of your containers.
Ingredients
For the cheesecake filling
- 1 box salted caramel cheesecake instant pudding or cheesecake mix (about 3.4 oz / 96 g)
- 8 oz (225 g) cream cheese, softened
- 2 cups cold whole milk
- 1 cup heavy whipping cream, cold
- 1/3 cup powdered sugar
- 1 teaspoon vanilla extract
- 1/3 cup caramel sauce
- 1/4 teaspoon salt, or to taste
For the crunchy layer
- 1 1/2 cups graham cracker crumbs
- 3 tablespoons melted butter
- 2 tablespoons brown sugar
- 1/3 cup chopped caramel pieces or toffee bits
- 1/4 cup chopped pecans or peanuts
For the topping
- 1/2 cup caramel sauce
- 1/3 cup chopped caramel candies or toffee pieces
- 1/3 cup chopped pecans or peanuts
- A small pinch of flaky sea salt
- Optional: whipped cream
Instructions
1. Prepare the crunchy cheesecake base
Start by preparing the crunchy mixture that will give the dessert the texture visible in the photo.
Place the graham cracker crumbs in a medium bowl. Add the melted butter and brown sugar. Mix everything together until the crumbs are evenly coated and resemble wet sand.
Add the chopped pecans or peanuts and the caramel or toffee pieces. Stir gently so that the crunchy ingredients are distributed throughout the mixture.
If you want an especially crunchy texture, spread the mixture onto a baking sheet and bake it at 350°F (175°C) for about 7–9 minutes. Let it cool completely before using.
If you want to keep the dessert completely no-bake, simply use the mixture directly. The cups will still taste delicious, although the crumbs will be softer.
2. Make the cheesecake mixture
Place the softened cream cheese in a large mixing bowl.
Beat it with an electric mixer for about 1–2 minutes, until smooth and creamy. Make sure there are no large lumps.
Add the powdered sugar and vanilla extract. Mix again until completely combined.
Next, add the salted caramel cheesecake mix or instant cheesecake pudding mix.
Gradually pour in the cold milk while mixing on low speed. Once the milk has been incorporated, increase the mixer speed slightly and continue mixing until the mixture becomes thick and creamy.
Do not add all the milk too quickly. Adding it gradually helps create a smoother cheesecake filling.
3. Add the caramel flavor
Pour approximately 1/3 cup of caramel sauce into the cheesecake mixture.
Add a small pinch of salt. The salt is important because it balances the sweetness of the caramel and gives the dessert its classic salted-caramel flavor.
Mix until everything is smooth.
Taste a small amount. If you want a stronger caramel flavor, you can add another tablespoon or two of caramel sauce.
4. Whip the cream
In a separate cold bowl, add the heavy whipping cream.
Beat it until soft peaks form.
Add the whipped cream to the cheesecake mixture in two or three additions. Fold gently with a spatula rather than aggressively mixing it.
This step makes the cheesecake filling light and fluffy rather than heavy.
Continue folding until you have a smooth, creamy mixture with an airy texture.
5. Assemble the dessert cups
Now comes the fun part.
Use small clear plastic dessert cups with lids, similar to the ones shown in the picture.
Add approximately 1–2 tablespoons of the crunchy graham cracker mixture to the bottom of each cup.
Gently press it down with the back of a spoon.
Next, add a layer of the salted caramel cheesecake filling.
You can use a piping bag for a cleaner and more professional appearance. Simply transfer the cheesecake mixture into a piping bag and squeeze it evenly into each cup.
Fill the cup approximately halfway.
6. Add another crunchy layer
Sprinkle a small amount of the caramel crunch mixture over the cheesecake layer.
Don’t add too much because you want to maintain a nice balance between creamy and crunchy textures.
The middle layer gives you a delicious surprise when you eat the dessert.
After adding the crunch, pipe another layer of cheesecake filling on top.
Smooth the surface with a spoon or leave it slightly rounded for a more attractive presentation.
7. Add the caramel topping
Drizzle a small amount of caramel sauce over the top of each cheesecake cup.
You don’t need a lot. A thin drizzle gives you plenty of caramel flavor while keeping the dessert from becoming overly sweet.
For a beautiful presentation, you can drizzle the caramel in a zigzag pattern.
Next, sprinkle the top with chopped caramel pieces or toffee bits.
Add some chopped pecans or peanuts.
Finally, add a tiny pinch of flaky sea salt.
The combination of creamy cheesecake, sweet caramel, crunchy pieces, nuts, and a little salt is what makes this dessert so good.
8. Chill the cheesecake cups
Put the finished cups in the refrigerator.
Allow them to chill for at least 2–4 hours.
For the best texture, you can prepare them the night before and leave them refrigerated overnight.
The chilling time allows the cheesecake mixture to become firmer and gives the flavors time to develop.
Keep the cups covered with their plastic lids while they are in the refrigerator.
9. Optional whipped cream topping
If you want your cups to look more like professional bakery or dessert-shop cups, add a small swirl of whipped cream just before serving.
Pipe the whipped cream onto the center of each cup.
Then add:
- A drizzle of caramel
- Chopped toffee
- Chopped pecans
- A tiny pinch of sea salt
Don’t add the whipped cream too early if you are preparing the cups several days ahead, because it can lose some of its texture.
Storage
Keep the cheesecake cups refrigerated at all times.
They are best enjoyed within 2–3 days.
Because the dessert contains cream cheese, milk, and whipped cream, it should not be left at room temperature for extended periods.
If you’re preparing these for a party, keep them refrigerated until you’re ready to serve them.
For selling or transporting, use cups with tight-fitting lids and keep them chilled.
How to Make Them Look Like the Photo
The presentation is very important with individual cheesecake cups.
Use clear plastic cups so that people can see the different layers.
Try to create the following pattern:
Crunch → Cheesecake → Crunch → Cheesecake → Caramel topping
The clear cup makes the creamy filling and crunchy pieces visible from the outside.
For the topping, use a mixture of small and medium pieces of caramel and nuts rather than crushing everything into a powder. This gives the dessert a more generous and homemade appearance.
A caramel drizzle around the top also makes the cups look more attractive.
Tips for the Best Results
Use softened cream cheese
Cold cream cheese can leave lumps in the filling. Let it soften at room temperature before mixing.
Use cold heavy cream
Cold cream whips much better and produces a lighter cheesecake mixture.
Don’t overmix
Once the whipped cream has been folded into the cheesecake mixture, mix gently. Overmixing can make the filling less fluffy.
Don’t use too much caramel
Caramel sauce adds a lot of sweetness. Start with the recommended amount and add more if necessary.
Add the crunch shortly before serving
If you prefer a very crunchy texture, reserve some of the caramel-nut mixture and sprinkle it over the cups just before serving.
Use a piping bag
A piping bag makes it much easier to create clean, even layers. It also makes the dessert look more professional.
Flavor Variations
You can easily change this recipe while keeping the same basic cheesecake mixture.
Chocolate Caramel
Add a little melted chocolate or chocolate cookie crumbs to the crunchy layer. Finish with caramel and chocolate pieces.
Pecan Caramel
Use toasted pecans instead of peanuts. The nutty flavor works especially well with salted caramel.
Apple Caramel
Add a thin layer of cooked cinnamon apples between the cheesecake layers. Finish with caramel and crushed graham crackers.
Banana Caramel
Add thin slices of banana between the layers and finish with caramel sauce and crushed nuts.
Cookie Crunch
Replace the graham crackers with crushed vanilla cookies, shortbread cookies, or caramel-flavored cookies.
Make-Ahead Version
These cups are excellent for preparing ahead of time.
You can assemble the cheesecake layers and refrigerate them several hours before serving.
For the best crunchy texture, prepare the caramel-nut topping separately and add it shortly before serving.
If you’re preparing them for an event, you can make the cheesecake mixture the day before, assemble the cups, cover them, and refrigerate them overnight.
Then, shortly before serving, add the final caramel drizzle and crunchy topping.
Serving Ideas
Serve the cups straight from the refrigerator.
They are especially good for:
- Birthday parties
- Family gatherings
- Dessert tables
- Baby showers
- School or community events
- Holiday dinners
- Picnics where they can remain properly chilled
- Individual dessert orders
You can also make smaller portions using mini cups. This is a good option if you’re serving several different desserts.
Conclusion
These Salted Caramel Crunch Cheesecake Cups combine everything you want in an easy dessert: a creamy cheesecake filling, rich caramel flavor, crunchy graham crackers, buttery toffee pieces, salty-sweet flavor, and crunchy nuts.
The recipe is simple enough for beginners because there is no complicated cheesecake baking process. Instead, the cheesecake mixture is prepared cold and assembled directly into individual cups.
The biggest secret is the contrast between smooth and crunchy textures. The creamy caramel cheesecake filling is soft and rich, while the graham cracker crumbs, toffee, and nuts provide a satisfying crunch. A final drizzle of caramel and a small pinch of sea salt bring all the flavors together.
For the closest presentation to your picture, use clear cups with lids, create two layers of cheesecake separated by a small crunchy layer, and finish each cup generously with caramel pieces and chopped nuts.
Recipe summary:
Prep: 25 minutes
Chill: 2–4 hours
Servings: 8–10 cups
Type: No-bake salted caramel cheesecake dessert
Difficulty: Easy 🍮