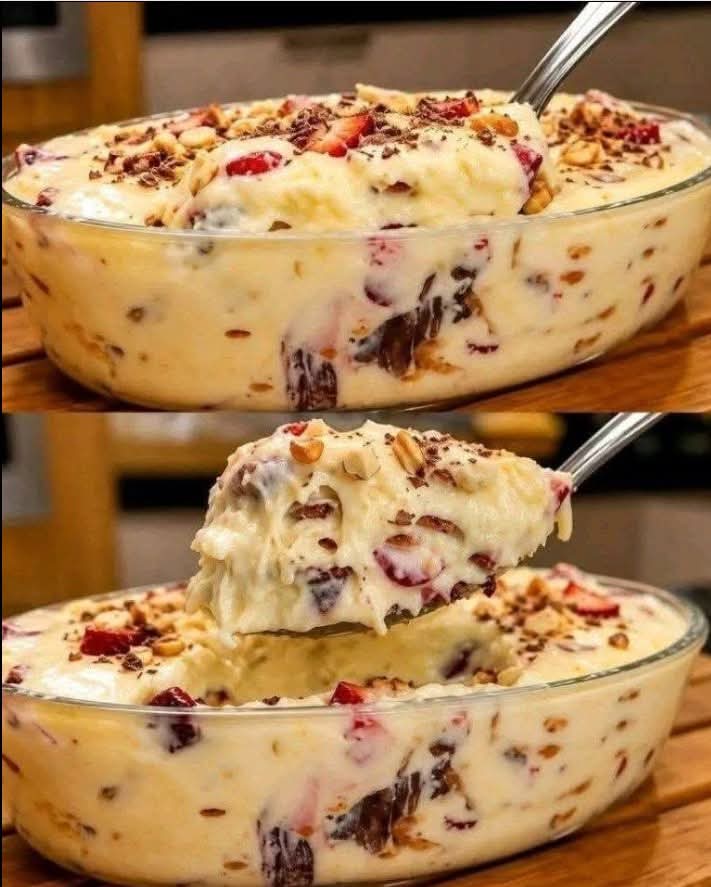

This irresistible no-bake dessert combines a rich, creamy vanilla filling with juicy strawberries, crunchy biscuit pieces, chocolate chunks, and chopped nuts. Every spoonful is smooth, sweet, and full of delicious textures. 🍓🍫
Inspired by your picture, this recipe makes a beautiful chilled dessert in a glass dish, perfect for family gatherings, parties, or a weekend treat. No oven is required, and the preparation is simple. The exact ingredients in the picture are not fully visible, so the quantities below are suggested to recreate a similar dessert.
Recipe Information
- Preparation time: 20 minutes
- Chilling time: 4–6 hours
- Total time: Approximately 6 hours
- Servings: 8
- Difficulty: Easy
- Cooking method: No-bake
Ingredients

For the creamy filling
- 500 ml cold heavy whipping cream (35% fat)
- 250 g mascarpone cheese or full-fat cream cheese
- 1 can (397 g) sweetened condensed milk
- 1 teaspoon vanilla extract
For the filling and texture
- 300 g fresh strawberries
- 150 g plain tea biscuits or digestive biscuits
- 100 g dark or milk chocolate, chopped
- 60 g chopped hazelnuts or peanuts
For decoration
- 4–5 fresh strawberries
- 20 g grated chocolate
- 1 tablespoon chopped nuts
Note: Because the original recipe is not shown, these ingredients are a suggested version based on the appearance of the dessert.
Instructions

Step 1: Prepare the strawberries
Wash the strawberries thoroughly and remove their green tops. Pat them completely dry with paper towels before cutting them into small pieces.
Set aside a few attractive strawberries for decorating the finished dessert.
Removing excess moisture is important because wet fruit can make the creamy filling watery. If the strawberries are especially juicy, place the chopped pieces on paper towels for a few minutes.

Step 2: Prepare the biscuits, chocolate, and nuts
Break the biscuits into small bite-sized pieces using your hands. Avoid crushing every biscuit into fine crumbs because the larger pieces provide a pleasant texture.
Chop the chocolate into small chunks and roughly chop the nuts.
Set everything aside in separate bowls. You can use digestive biscuits, tea biscuits, or another firm plain biscuit. Hazelnuts give the dessert a rich flavor, while peanuts offer a more affordable alternative.

Step 3: Whip the cream
Pour the cold whipping cream into a large, chilled mixing bowl.
Using an electric mixer, beat the cream at medium speed until it forms soft peaks. Continue briefly until it becomes thick enough to hold its shape, but stop before it becomes grainy.
Cold cream whips more easily, so keep it refrigerated until you are ready to use it. Do not overwhip, as this can cause the cream to separate.

Step 4: Make the creamy base
In another bowl, gently mix the mascarpone cheese with the condensed milk and vanilla extract until smooth.
Add the whipped cream in two or three batches, folding gently with a spatula after each addition.
Use slow movements from the bottom of the bowl toward the top to preserve the air in the whipped cream. The mixture should become light, thick, and creamy.
If you prefer a less sweet dessert, start with about three-quarters of the condensed milk and add more according to taste.

Step 5: Combine the filling ingredients
Add the chopped strawberries, biscuit pieces, chocolate chunks, and most of the chopped nuts to the creamy base.
Fold everything together gently until the ingredients are distributed evenly.
Avoid stirring too vigorously, because the strawberries can release juice and the biscuit pieces may break down. Reserve a small amount of chocolate and nuts for decorating the top.

Step 6: Transfer to the serving dish
Spoon the mixture into a clean glass serving dish. Spread it evenly with a spatula, gently pressing the filling into the corners.
Smooth the top without compressing the mixture too much.
A clear glass dish is ideal because it showcases the strawberries, chocolate, biscuit pieces, and nuts throughout the creamy filling, similar to the dessert in your photograph.

Step 7: Decorate the dessert
Arrange the reserved strawberry pieces across the top. Sprinkle with the remaining chopped nuts and grated chocolate.
For a more elegant appearance, distribute the toppings evenly rather than concentrating them in one area.
You can also add a few small chocolate curls or thin strawberry slices just before serving.

Step 8: Refrigerate and serve
Cover the dish and refrigerate for at least 4–6 hours, preferably overnight.
Chilling allows the filling to firm up and helps the flavors come together. When ready to serve, scoop generous portions into dessert bowls with a large spoon.
Keep the dessert refrigerated until serving time, especially because it contains dairy cream and fresh fruit.
Tips for the Perfect Creamy Dessert
- Use cold whipping cream: This helps achieve a thick, airy filling.
- Dry the strawberries well: Excess moisture can soften the dessert too much.
- Fold instead of beating: Gentle folding preserves the cream’s light texture.
- Choose the right biscuits: Firm biscuits provide better texture than very soft cakes.
- Balance the sweetness: Dark chocolate and slightly tart strawberries balance the condensed milk.
- Allow enough chilling time: Overnight refrigeration generally gives the best consistency.
- Add delicate decorations last: Fresh strawberry slices look their best when added shortly before serving.
Delicious Variations


1. Strawberry and white chocolate dessert
Replace the dark chocolate with white chocolate pieces. This creates a sweeter, milder flavor that pairs beautifully with strawberries.
2. Chocolate biscuit version
Add an extra 100 g of chocolate biscuits instead of plain biscuits. This gives the dessert a deeper cocoa flavor and a darker appearance.
3. Mixed berry dessert
Replace some of the strawberries with raspberries or blueberries. Make sure the fruit is well dried before folding it into the cream.
4. Banana and chocolate version
Replace half the strawberries with sliced bananas. For the best texture and color, prepare this version shortly before chilling and serving.
5. Coffee and chocolate version
Add 1–2 teaspoons of cooled, concentrated coffee to the mascarpone mixture. The coffee flavor pairs especially well with dark chocolate and hazelnuts.
Serving Suggestions
This dessert is ideal for birthdays, family dinners, celebrations, or a sweet treat after lunch.
- Serve chilled in small dessert bowls.
- Add fresh strawberries to each portion.
- Pair with coffee or tea.
- Garnish with grated chocolate and chopped hazelnuts.
- Serve in individual glasses for a party or buffet.
For the most attractive presentation, use a transparent dish and let the dessert chill completely before serving. A large spoon will create generous portions that reveal the creamy texture and colorful pieces inside.
Storage and Food Safety
Store the dessert covered in the refrigerator at 4°C (40°F) or below. Because it contains fresh strawberries and dairy cream, it is best enjoyed within 2–3 days.
Do not leave it at room temperature for more than two hours, or one hour in very hot conditions. Freezing is possible, but it may change the texture of the cream and strawberries after thawing.
Conclusion
This no-bake strawberry chocolate dessert is a wonderful combination of creamy filling, juicy fruit, crunchy biscuits, chocolate, and nuts. It looks impressive in a glass dish but requires no oven and uses straightforward ingredients.
The key to success is whipping the cream properly, folding the ingredients gently, drying the fruit, and allowing enough time for the dessert to chill.
Pro tip: Prepare it the night before serving. The filling will have more time to set, making each spoonful thick, creamy, and full of strawberries and chocolate. 🍓🍫🥄