

Introduction
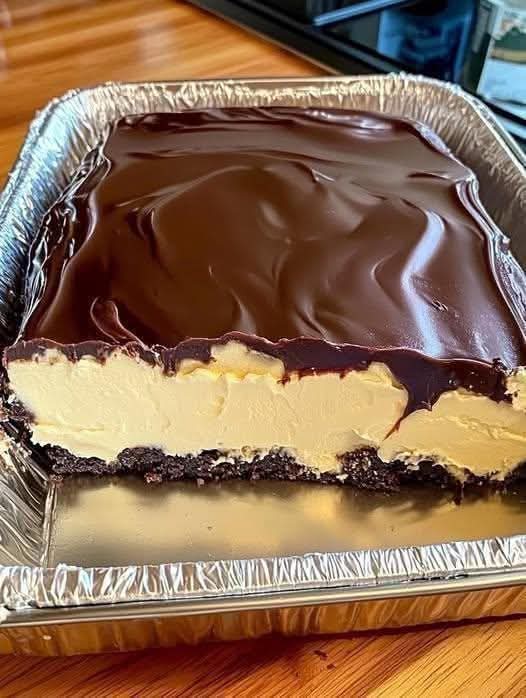
Imagine cutting into a beautiful chocolate dessert with a crunchy chocolate cookie crust, a thick and creamy peanut butter cheesecake filling, and a smooth, glossy chocolate topping that melts in your mouth. This is the delicious dessert shown in your picture: a rich Chocolate Peanut Butter Cheesecake, made in a rectangular pan and cut into generous slices.
This recipe is perfect for chocolate lovers, peanut butter lovers, family gatherings, birthday celebrations, holidays, or simply a weekend treat. It combines two classic flavors that taste wonderful together: deep chocolate and creamy peanut butter. The bottom layer provides a chocolate cookie crunch, the middle layer is soft and creamy, and the top layer adds a luxurious chocolate finish.
The best part is that this version is designed as a no-bake cheesecake. You do not need to prepare a traditional cake batter or spend a long time baking in the oven. Instead, you create the layers, chill them until firm, and finish with a beautiful chocolate ganache.
The result is a dessert that looks professional but is simple enough to prepare at home. Whether you are a beginner or an experienced baker, this recipe will help you create a cheesecake that your family and friends will love.
No-bakeChocolate & peanut butterServes 12–16
Prep: 30–40 min
Chill: 6 hours or overnight
Ingredients
This recipe makes approximately 12 to 16 cheesecake bars, depending on the size of your slices.
1. Chocolate Cookie Crust


- 300 g chocolate sandwich cookies, such as Oreos.
- 90 g unsalted butter, melted.
- 1 tablespoon cocoa powder, optional, for a deeper chocolate flavor.
- A small pinch of salt, optional.
The cookie crust creates the firm chocolate base that supports the creamy filling. Chocolate sandwich cookies work especially well because their chocolate flavor pairs beautifully with the peanut butter.
2. Creamy Peanut Butter Cheesecake Filling
- 500 g full-fat cream cheese, softened to room temperature.
- 250 g smooth peanut butter.
- 150 g powdered sugar.
- 1 teaspoon pure vanilla extract.
- 250 ml cold heavy whipping cream.
- 2 tablespoons powdered sugar, extra for whipping the cream.
- 1 pinch of salt, optional.
- 100 g melted white chocolate, optional, to help the filling set more firmly.
Important: Use smooth, regular peanut butter rather than very runny natural peanut butter if you want a firm, sliceable cheesecake. If using natural peanut butter, stir it thoroughly before measuring.
3. Chocolate Ganache Topping
- 200 g semi-sweet or dark chocolate, finely chopped.
- 180 ml heavy cream.
- 1 tablespoon unsalted butter, optional, for extra shine.
- 1 teaspoon honey or golden syrup, optional, for a glossy finish.
The ganache creates the smooth chocolate layer seen on top of the dessert in your picture.
4. Optional Decoration
- Mini chocolate chips.
- Crushed chocolate cookies.
- Chopped roasted peanuts.
- Chocolate curls.
- A little melted peanut butter for drizzling.
- A pinch of flaky sea salt.
These decorations are optional, but they can make your cheesecake look even more attractive.
Equipment
Before beginning, prepare the following:
- One rectangular baking pan, approximately 23 × 33 cm (9 × 13 inches).
- Parchment paper.
- Food processor or a rolling pin and a sealed bag.
- Mixing bowls.
- Electric hand mixer or stand mixer.
- Rubber spatula.
- Measuring cups and kitchen scale.
- Small saucepan or microwave-safe bowl.
- Refrigerator.
A rectangular pan gives you the same general style as the cheesecake in the picture. If you prefer a thicker dessert, use a smaller pan, around 23 × 23 cm.
Instructions and Methods
Step 1: Prepare the Baking Pan
Line your rectangular pan with parchment paper, leaving a little extra paper hanging over the sides. This will make it easier to lift the cheesecake out after chilling.
You can lightly grease the pan before adding the parchment paper so it stays in place.
Make sure the pan is clean and completely dry before starting.
Step 2: Make the Chocolate Cookie Crust
Place the chocolate sandwich cookies into a food processor and pulse until they become fine crumbs.
If you do not have a food processor, put the cookies into a strong sealed bag and crush them with a rolling pin. Continue crushing until you have a texture similar to wet sand.
Melt the butter in a small saucepan or microwave. Allow it to cool slightly, then pour it over the cookie crumbs.
Add the cocoa powder and a pinch of salt if desired. Mix everything together until the crumbs are evenly coated and resemble damp sand.
Forming the crust
Transfer the cookie mixture into the prepared pan. Spread it evenly across the bottom.
Use the flat bottom of a glass or measuring cup to press the crumbs down firmly. Pay special attention to the corners and edges.
The crust should be compact and even. A firm crust prevents the bars from falling apart when you cut them.
Place the pan in the refrigerator for at least 20 to 30 minutes while you prepare the filling.
Tip: Do not leave the crust loose. Pressing it firmly is one of the most important steps in creating beautiful cheesecake bars.
Step 3: Prepare the Peanut Butter Filling
In a large mixing bowl, place the softened cream cheese.
Beat the cream cheese with an electric mixer until smooth and creamy. Scrape down the sides of the bowl to make sure there are no large lumps.
Add the peanut butter, powdered sugar, vanilla extract, and a pinch of salt.
Mix again until everything is fully combined. The mixture should become thick, smooth, and creamy.
If you are using melted white chocolate, melt it gently and allow it to cool slightly. Make sure it is still liquid but not hot. Add it to the cream cheese mixture and beat until incorporated.
The white chocolate is optional, but it can help the filling become firmer after chilling.
Why softened cream cheese matters
Cold cream cheese can create lumps and make the filling difficult to mix. Allowing it to soften at room temperature gives you a much smoother result.
Do not overheat the cream cheese. It should be soft, not warm or melted.
Step 4: Whip the Heavy Cream
In a separate, clean bowl, pour in the cold heavy whipping cream.
Add the extra powdered sugar.
Using an electric mixer, whip the cream until it forms medium to stiff peaks.
This means that when you lift the beaters, the cream should hold its shape. Be careful not to overwhip, or the cream may become grainy.
Combining the cream and peanut butter mixture
Add approximately one-third of the whipped cream to the peanut butter cream cheese mixture.
Gently fold it in using a rubber spatula.
Continue adding the remaining whipped cream in two portions. Fold carefully until the mixture becomes light, fluffy, and evenly combined.
Do not stir aggressively. Folding helps preserve the air in the whipped cream, which gives the cheesecake a soft and creamy texture.
The final filling should be thick enough to spread but smooth enough to create an even layer.
Step 5: Assemble the Cheesecake
Remove the chilled cookie crust from the refrigerator.
Spoon the peanut butter cheesecake filling over the crust.
Use a spatula to spread the filling evenly from one corner to the other.
Make sure the filling reaches the edges of the pan.
Smooth the top with the back of the spatula. You can also gently tap the pan on the counter to remove large air bubbles.
At this stage, the dessert should have two clear layers:
- A dark chocolate cookie crust.
- A thick, pale peanut butter cheesecake filling.
Place the pan back into the refrigerator while you prepare the chocolate topping.
Chill for at least 30 minutes before pouring the ganache, especially if the filling is soft.
Step 6: Make the Chocolate Ganache
Finely chop the chocolate and place it in a heatproof bowl.
Pour the heavy cream into a small saucepan.
Heat the cream over medium-low heat until it becomes hot and begins to steam. Do not allow it to boil vigorously.
Pour the hot cream over the chopped chocolate.
Let the mixture sit for 2 to 3 minutes. This gives the heat time to soften the chocolate.
Slowly stir from the center outward until the chocolate melts completely and the ganache becomes smooth.
If desired, add the butter and honey or golden syrup. Stir until fully incorporated.
The finished ganache should be shiny, smooth, and pourable.
Important ganache tip
If the chocolate does not melt completely, place the bowl over a saucepan of gently simmering water and stir carefully. Avoid getting water into the chocolate.
You can also microwave the mixture in short intervals, stirring between each interval.
Step 7: Add the Chocolate Topping
Remove the cheesecake from the refrigerator.
Pour the chocolate ganache over the peanut butter filling.
Use a spatula to spread it gently across the surface.
Create a perfectly smooth top, or leave a few natural swirls for a homemade look.
The chocolate should cover the entire cheesecake, including the corners.
If you want to decorate the dessert, sprinkle chopped roasted peanuts or crushed chocolate cookies over the ganache while it is still soft.
You can also drizzle a little melted peanut butter over the top and use a toothpick to create a beautiful pattern.
Step 8: Chill Until Firm
Place the finished cheesecake in the refrigerator.
For the best results, chill for at least 6 hours. Overnight is even better.
This chilling time allows the filling to become firm enough to cut into neat bars.
Do not rush this step. A no-bake cheesecake needs enough time to set.
If you cut it too early, the filling may be soft and the layers may slide apart.
History and Formation of the Dessert
The History of Cheesecake
Cheesecake is a dessert with a long history. Ancient versions of cheesecake were made using simple ingredients such as cheese, honey, and flour. Over time, cheesecake recipes developed across Europe and later became especially popular in the United States.
Modern cheesecake is often made with cream cheese, sugar, eggs, and a cookie or biscuit crust. Some versions are baked, while others are prepared without baking.
The no-bake cheesecake became popular because it is easier to prepare and does not require an oven. It is especially convenient during warm weather or when someone wants a quick dessert for a gathering.
The History of Chocolate and Peanut Butter
Chocolate and peanut butter are two ingredients that have become famous for their delicious combination.
Peanut butter is made from ground peanuts and is known for its creamy texture and rich nutty flavor. Chocolate adds sweetness, bitterness, and a luxurious finish.
When combined, these ingredients create a balance between salty, sweet, creamy, and rich flavors.
Chocolate peanut butter desserts became especially popular in American baking, including cookies, candies, pies, brownies, and cheesecakes.
This cheesecake brings those flavors together in a layered dessert that is easy to share.
The Formation of the Cheesecake
The formation of this dessert depends on three different textures:
The bottom layer: Chocolate cookie crust
The crust is made from crushed cookies and melted butter. The butter binds the crumbs together when chilled.
The middle layer: Peanut butter cheesecake
The cream cheese gives the filling a smooth, slightly tangy flavor. Peanut butter adds richness and a nutty taste. Whipped cream makes the texture lighter and softer.
The top layer: Chocolate ganache
Ganache is made by combining chocolate and hot cream. When cooled, it forms a smooth, rich topping that adds a beautiful chocolate finish.
Together, these layers create a dessert that is crunchy, creamy, and silky.
Tips for Perfect Cheesecake Bars
1. Use full-fat cream cheese
Full-fat cream cheese usually provides a richer and firmer cheesecake filling. Low-fat varieties may create a softer texture.
2. Chill long enough
The refrigerator is essential for a no-bake cheesecake. Give the dessert enough time to set completely.
3. Use good-quality chocolate
The flavor of the ganache depends heavily on the chocolate you choose. Semi-sweet chocolate gives a balanced taste, while dark chocolate creates a more intense flavor.
4. Do not overwhip the cream
Whip until the cream holds its shape, but stop before it becomes grainy.
5. Cut with a warm knife
For clean slices, dip a sharp knife in hot water, wipe it dry, and cut the cheesecake.
Clean the knife between slices.
6. Keep the cheesecake cold
Because this dessert contains cream cheese and whipped cream, keep it refrigerated until serving.
7. Adjust the sweetness
If you prefer a less sweet dessert, use dark chocolate for the ganache and reduce the powdered sugar slightly.
Serving Suggestions
These cheesecake bars are delicious served cold, straight from the refrigerator.
You can serve them with:
- A cup of coffee.
- A glass of cold milk.
- Whipped cream.
- A scoop of vanilla ice cream.
- Fresh strawberries.
- A drizzle of peanut butter.
- Chopped roasted peanuts.
For a special presentation, cut the cheesecake into small rectangular bars and place them on a white serving plate.
The contrast between the dark chocolate topping and the pale peanut butter filling makes the dessert look elegant.
Storage Instructions
Store the cheesecake in an airtight container in the refrigerator.
It is best enjoyed within 3 to 4 days.
You can also freeze individual bars. Wrap each bar tightly in plastic wrap and place them in a freezer-safe container.
Freeze for up to 1 month for best quality.
To serve, transfer the bars to the refrigerator and allow them to thaw slowly.
Do not leave the cheesecake at room temperature for long periods, especially in warm weather.
Conclusion
This Chocolate Peanut Butter Cheesecake is a rich, creamy, and beautiful dessert that brings together the best of chocolate and peanut butter.
The crunchy chocolate cookie crust provides the perfect foundation. The creamy peanut butter filling creates a soft and delicious middle layer. The smooth chocolate ganache adds a luxurious finish that makes every bite special.
The recipe is simple, requires no baking, and can be prepared ahead of time. It is perfect for birthdays, celebrations, family dinners, holidays, or anyone who loves chocolate and peanut butter.
The secret to success is using good ingredients, pressing the crust firmly, folding the whipped cream gently, and allowing the cheesecake to chill completely.
Once you try this recipe, you will understand why chocolate peanut butter desserts are loved by so many people. Every bite combines crunchy, creamy, sweet, and chocolatey flavors in one unforgettable treat.
Enjoy your homemade Chocolate Peanut Butter Cheesecake Bars! 🍫🥜🍰