Soft, Fluffy Homemade Bread for Beginners ❤️
There’s something incredibly special about pulling a warm, homemade loaf of bread from the oven. The golden crust, the soft fluffy center, and that irresistible fresh-baked aroma can make even an ordinary day feel like a celebration.
And the best part? You don’t need a mixer, a fancy bread machine, or a kitchen covered in flour!
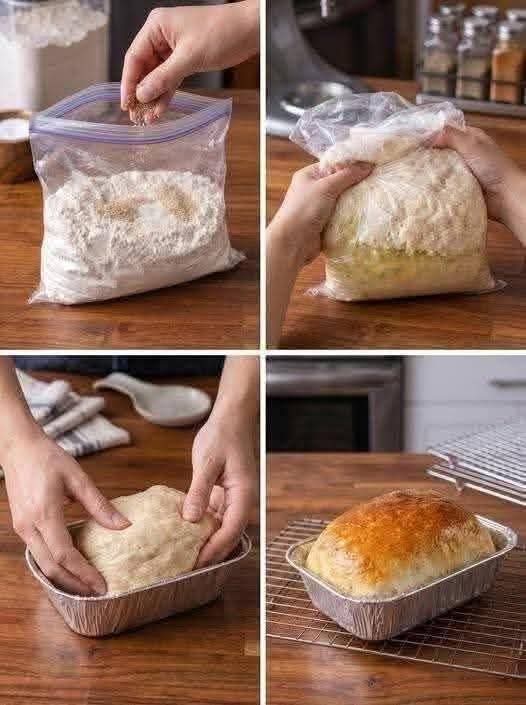
This clever Bread in a Bag method keeps the mess contained while making homemade bread simple enough for beginners. It’s also a wonderful recipe to make with children because they can help shake and knead the dough right inside the bag.
If you love the smell of homemade bread but think yeast bread is too difficult, this is the recipe to try! 🥰
🛒 INGREDIENTS
- 3 cups all-purpose flour
- 3 teaspoons sugar
- 1 packet instant or rapid-rise yeast
- 1¼ teaspoons salt
- 3 tablespoons olive oil
- 1 cup warm water, not hot
- A little extra flour for shaping
- A little olive oil for greasing the pan
👩🍳 INSTRUCTIONS
1. Prepare Your Bag
Use a sturdy, food-safe, large resealable bag. Open it wide and add:
- 1½ cups of the flour
- Sugar
- Instant yeast
- Salt
Seal the bag while leaving a little air inside.
Gently shake the bag so the dry ingredients are evenly distributed.
2. Add the Wet Ingredients
Open the bag and pour in the warm water and olive oil.
Seal the bag securely again.
Now comes the fun part! Gently squeeze, squish, and knead the mixture through the bag until everything begins coming together.
3. Add the Remaining Flour
Add the remaining 1½ cups of flour gradually.
Seal the bag and continue kneading until a soft dough forms.
The dough should feel soft and slightly tacky, but it shouldn’t be extremely sticky. If necessary, add a tablespoon of flour at a time.
4. Knead the Dough
Once the dough has come together, continue kneading it inside the bag for approximately 5–8 minutes.
You can press, fold, and squeeze the dough through the bag.
This is where the gluten develops, giving your finished bread its lovely structure and chewy-soft texture.
5. Let It Rise
Leave the dough inside the sealed bag and place it somewhere warm and draft-free.
Allow it to rise for approximately 45–60 minutes, or until it has noticeably increased in size.
⏰ Rising time can vary depending on the temperature of your kitchen.
6. Shape the Loaf
Lightly flour your work surface.
Carefully remove the dough from the bag and place it on the surface.
Gently press out excess air, then shape the dough into a round loaf or an oval loaf.
Place it into a lightly greased loaf pan or onto a lined baking sheet.
7. Second Rise
Cover the dough loosely with a clean kitchen towel.
Let it rest for another 20–30 minutes, until it looks puffy.
Meanwhile, preheat your oven to 375°F / 190°C.
8. Bake
Place the bread in the preheated oven.
Bake for approximately 30–35 minutes, or until the loaf is beautifully golden brown and sounds hollow when gently tapped underneath.
Every oven is different, so begin checking toward the end of the baking time.
9. Cool Before Slicing
Remove the bread from the pan and place it on a wire rack.
Let it cool for at least 20–30 minutes before slicing.
I know it’s difficult to wait when the kitchen smells amazing—but allowing the loaf to cool helps the interior finish setting properly. ❤️
🌾 THE METHOD BEHIND THE MAGIC
The secret isn’t complicated.
Yeast provides the leavening, while flour contains proteins that develop gluten when hydrated and kneaded. The gluten network helps trap the gases produced by the yeast, allowing the dough to rise and creating the characteristic soft structure of bread.
The olive oil contributes tenderness, while the small amount of sugar gives the yeast a little readily available food and adds a touch of sweetness.
And the bag?
It simply gives you a wonderfully convenient place to mix and knead everything without covering your countertop in sticky dough!
📜 A LITTLE HISTORY OF HOMEMADE BREAD
Bread is one of the oldest prepared foods in human history. Long before modern mixers and electric ovens existed, people mixed flour and water by hand and baked dough using simple hearths and ovens.
Yeast-leavened bread became especially important as bakers learned to harness natural fermentation. Over centuries, bread-making traditions developed around the world, with each culture creating its own shapes, ingredients, techniques, and flavors.
Today’s Bread in a Bag method doesn’t replace those traditional techniques—it simply gives the home baker a wonderfully modern, low-mess way to enjoy the same timeless pleasure of making bread from scratch.
✨ FORMING YOUR PERFECT LOAF
For a classic sandwich-style loaf, shape the dough into a smooth log and place it in a greased loaf pan.
For a rustic country-style loaf, shape it into a round boule and place it on a baking sheet.
You can also divide the dough into smaller pieces and make individual dinner rolls.
For a beautiful bakery-style finish, lightly dust the top with flour and make a few shallow cuts across the surface before baking.
❤️ FOR THE LOVERS OF HOMEMADE BREAD
This recipe is especially wonderful for:
❤️ First-time bread bakers
❤️ Busy families
❤️ Kids who love helping in the kitchen
❤️ Anyone who hates messy countertops
❤️ Weekend baking projects
❤️ Homemade sandwiches
❤️ Toast lovers
❤️ Warm bread with butter and jam
❤️ Cozy breakfasts and family dinners
Imagine serving this bread warm with a little butter melting over the top. Or slicing it for sandwiches the next day. Or simply tearing off a piece while it’s still slightly warm.
Sometimes the simplest homemade foods become the ones everyone remembers.
💡 HELPFUL BREAD TIPS
🌡️ Don’t use hot water: Very hot water can damage the yeast. The water should feel comfortably warm.
🥣 Measure flour carefully: Too much flour can make the loaf dense. If possible, use a kitchen scale or spoon flour into your measuring cup and level it.
⏳ Watch the dough, not just the clock: Yeast works at different speeds depending on your kitchen temperature.
🤲 Don’t over-flour: A slightly tacky dough can produce a softer loaf than a heavily floured one.
🔥 Preheat properly: A fully heated oven helps the bread rise and brown properly.
🔪 Let it cool: Cutting immediately can make the interior seem gummy. Give the loaf time to finish setting.
🧈 SERVING IDEAS
Serve slices with:
- Butter and honey
- Strawberry or raspberry jam
- Peanut butter
- Cream cheese
- Eggs and avocado
- Soup or stew
- Your favorite sandwich fillings
And honestly, sometimes fresh bread + butter + a cup of coffee is all you need. ☕🍞❤️
🥰 FINAL THOUGHT
Homemade bread doesn’t have to be intimidating.
You don’t need expensive equipment. You don’t need years of baking experience. And you certainly don’t need to spend the afternoon scrubbing dough from every surface in your kitchen.
With a simple bag, a handful of everyday ingredients, and a little patience, you can create a beautiful homemade loaf that fills your home with that unforgettable bakery-fresh aroma.
So gather your ingredients, grab a sturdy food-safe bag, and give this beginner-friendly bread a try.
If you love homemade bread, express something so I know you’re here and I can keep sharing more recipes. ❤️
Thank you for being part of our recipe-loving family!
🍞 COMMENT “YUMMY” IF YOU’D LIKE TO SAVE THIS RECIPE AND TRY IT! 😍
Happy baking, bread lovers! ❤️