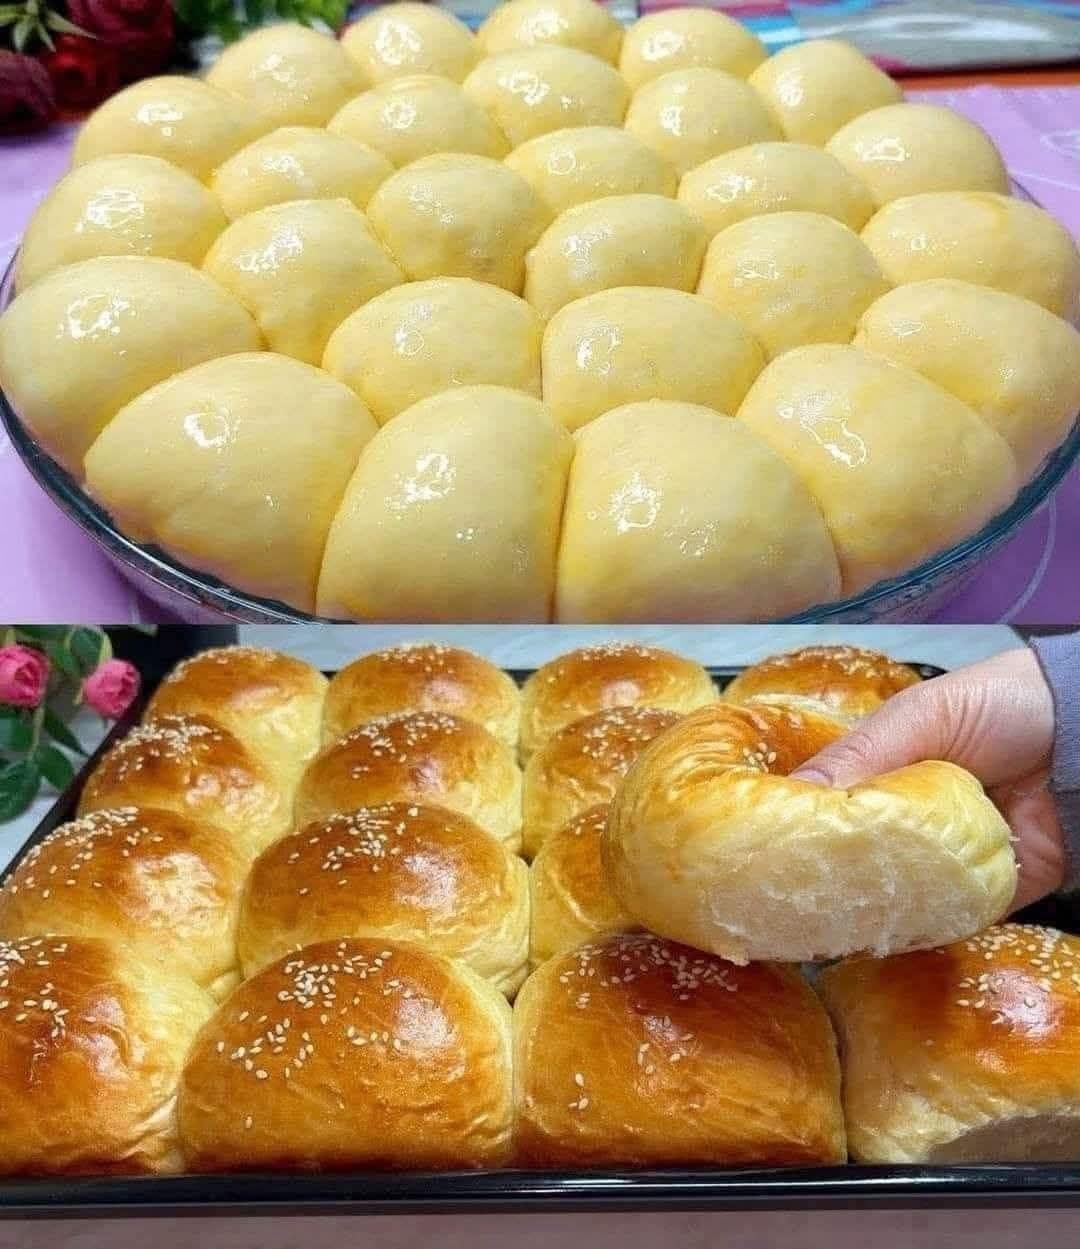
Absolutely! 🥐🥛 Here is a big, detailed Milk Brioche Rolls recipe inspired by the beautiful rolls in your picture. They are soft, fluffy, buttery, slightly sweet, and golden on top, perfect for breakfast, sandwiches, or with coffee/tea.
🥐 Milk Brioche Rolls — Soft, Fluffy & Golden
🌟 Introduction
Milk brioche rolls are wonderfully soft bread rolls enriched with milk, eggs, butter, and a little sugar. Unlike ordinary bread, brioche has a rich, tender texture and a beautiful golden color.
The secret is in the dough: it should be soft and slightly sticky, then kneaded well until it becomes smooth and elastic. After rising and shaping, the rolls are brushed with egg wash and baked until beautifully golden.
This recipe makes approximately 16–20 medium rolls.
📜 A Little History
Brioche is a classic French enriched bread that has been made for centuries. The word “brioche” is associated with French baking traditions, and the bread became especially popular because of its rich ingredients such as butter and eggs.
Traditional brioche can be quite rich and buttery. Milk brioche rolls are a softer, slightly lighter variation that is especially popular for breakfast and as dinner rolls.
Today, similar soft milk rolls are made in many countries, with different names and small variations in ingredients and shaping.
🛒 Ingredients
🥛 For the dough
- 4 cups all-purpose flour — approximately 500 g
- 1 cup whole milk — 240 ml, lukewarm
- 2 large eggs, room temperature
- 60 g unsalted butter, softened
- ¼ cup granulated sugar — approximately 50 g
- 2¼ teaspoons active dry yeast — 1 packet / about 7 g
- 1 teaspoon salt
- 1 teaspoon vanilla extract — optional
- 1 tablespoon powdered milk — optional, but excellent for extra softness
🥚 For the topping
- 1 egg
- 1 tablespoon milk
Mix these together to make the egg wash.
🌾 Optional toppings
- Sesame seeds
- Poppy seeds
- A little melted butter
- Honey after baking
👩🍳 Method 1 — Preparing the Yeast
- Pour the lukewarm milk into a bowl.
- Add the sugar.
- Add the yeast.
- Mix gently.
- Leave it for approximately 5–10 minutes.
The milk should be warm, not hot. Around 43°C / 110°F is ideal.
If the yeast becomes foamy, it’s ready.
⚠️ If the milk is too hot, it can kill the yeast.
🥣 Method 2 — Making the Dough
- In a large bowl, add:
- flour
- salt
- powdered milk if using
- Make a hole in the center.
- Add:
- eggs
- milk and yeast mixture
- vanilla if using
- Mix everything together until a rough dough forms.
- Add the softened butter gradually.
- Continue mixing and kneading until the butter is completely incorporated.
At first the dough may seem sticky and difficult to work with.
Don’t immediately add lots of flour.
That’s important because too much flour will make the finished rolls heavy instead of soft.
💪 Method 3 — Kneading
Knead the dough for approximately:
10–15 minutes by hand
or
8–10 minutes using a stand mixer.
The finished dough should become:
- Smooth
- Elastic
- Soft
- Slightly sticky
- Stretchable
✨ The windowpane test
Take a small piece of dough and gently stretch it.
If you can stretch it into a thin membrane without it immediately tearing, your gluten has developed well.
That’s a very good sign.
⏰ Method 4 — First Rise
Place the dough into a lightly greased bowl.
Cover it with plastic wrap or a clean kitchen towel.
Leave it somewhere warm for approximately:
1–2 hours
or until it has approximately doubled in size.
The exact time depends on the temperature of your kitchen.
🥐 Method 5 — Dividing the Dough
Once the dough has doubled:
- Gently press the dough down to remove excess air.
- Transfer it to a lightly floured surface.
- Divide it into approximately 16–20 equal pieces.
For very uniform rolls, each piece can be around 45–55 g.
❤️ Method 6 — Formation / Shaping
This is where you get the beautiful shape shown in your picture.
Take one piece of dough.
Step 1
Pull the edges toward the center.
Step 2
Turn the dough over.
Step 3
Place your hand over it and gently rotate it against the work surface.
This creates a smooth, round ball.
Make sure the surface is tight and smooth.
Repeat with all the pieces.
🍞 Method 7 — Arranging the Rolls
Grease a large baking tray.
Place the dough balls next to each other, leaving approximately 1–2 cm between them.
As they rise, they will expand and eventually touch each other.
This is what creates those beautiful pull-apart milk brioche rolls.
Cover the tray again.
Leave them for another:
30–60 minutes
until they become noticeably puffy.
🥚 Method 8 — Egg Wash
Mix:
- 1 egg
- 1 tablespoon milk
Whisk together.
Gently brush the tops of the rolls.
Don’t press too hard because the dough is very delicate after the second rise.
Optional ❤️
Sprinkle sesame seeds on top.
🔥 Method 9 — Baking
Preheat your oven to:
180°C / 350°F
Bake for approximately:
18–25 minutes
until the rolls become beautifully golden brown.
The exact baking time depends on the size of your rolls and your oven.
If the tops become brown too quickly, cover them loosely with aluminum foil for the remaining baking time.
🧈 Method 10 — The Secret Finishing Step
As soon as the rolls come out of the oven, brush them lightly with:
melted butter
This gives them:
✨ A beautiful shine
✨ A softer crust
✨ A richer flavor
✨ That delicious bakery-style finish
Allow them to cool for approximately 10–15 minutes before eating.
🤤 What the Finished Rolls Should Be Like
The perfect milk brioche roll should have:
Outside:
Golden, shiny and lightly crisp.
Inside:
Very soft, fluffy and slightly stretchy.
Flavor:
Milky, buttery and gently sweet.
When you pull one apart, you should see a soft, airy interior like the roll shown in your picture.
❤️ Tips for Brioche Lovers
🥛 1. Use whole milk
Whole milk gives better richness and softness than skimmed milk.
🧈 2. Don’t melt the butter
Use softened butter, not hot melted butter.
🌡️ 3. Don’t overheat the milk
Milk that’s too hot can kill the yeast.
🌾 4. Don’t add too much flour
A slightly sticky dough is normal.
Adding too much flour is one of the easiest ways to make brioche rolls dense.
⏰ 5. Don’t rush the rising
If the dough hasn’t doubled, give it more time.
🥚 6. Use egg wash
This is what gives the rolls that beautiful shiny golden appearance.
🧈 7. Butter after baking
This keeps the crust soft and gives the rolls a wonderful flavor.
🧊 Storage
Room temperature
Keep the rolls in an airtight container or bag for approximately 2–3 days.
Refrigerator
You can refrigerate them, but they may become firmer. Warm them slightly before eating.
Freezer
Let them cool completely, then place them in a freezer-safe bag.
They can be frozen for approximately 2–3 months.
To eat them again, thaw and warm them in the oven for a few minutes.
☕ How to Enjoy Them
These rolls are fantastic with:
- 🧈 Butter
- 🍯 Honey
- 🍓 Strawberry jam
- 🍫 Chocolate spread
- 🧀 Cream cheese
- 🥜 Peanut butter
- ☕ Coffee
- 🍵 Tea
- 🥛 Hot milk
They can also be used as breakfast sandwich buns with cheese, eggs, chicken, or other fillings.
🌟 Conclusion
The key to these beautiful milk brioche rolls is patience.
Use a soft dough, knead it properly, allow it to rise twice, shape the rolls carefully, and don’t skip the egg wash.
The result is a tray full of soft, golden, fluffy rolls that pull apart beautifully—exactly the kind you can see in your photo. 🥐❤️
The most important formula to remember:
soft dough + good kneading + enough rising time + gentle shaping + egg wash = beautiful brioche rolls.