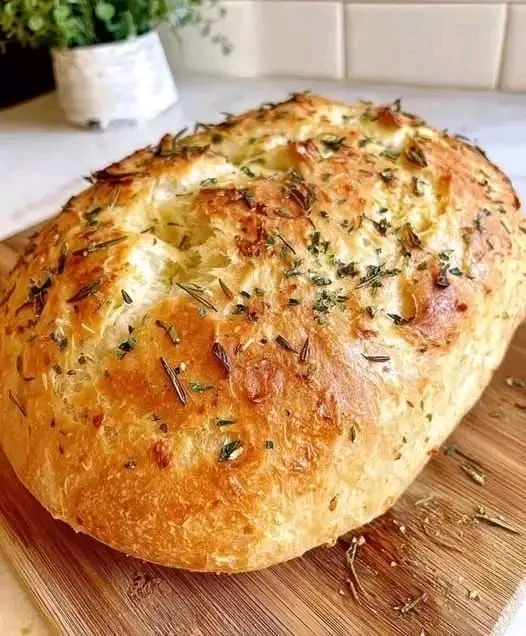
The Easiest No-Knead Homemade Bread (No Eggs, No Butter)
There’s something magical about the aroma of freshly baked bread filling your kitchen. This incredibly simple no-knead bread recipe proves that you don’t need expensive ingredients, fancy equipment, or years of baking experience to create a beautiful artisan-style loaf. With just a handful of pantry staples, you can bake a loaf with a golden, crispy crust and a soft, fluffy interior that’s perfect for sandwiches, soups, toast, or simply enjoying with olive oil and herbs.
This bread is ideal for beginners because there’s no kneading, no eggs, and no butter required. The long resting time allows the dough to develop gluten naturally, resulting in a bakery-quality loaf with minimal effort. It’s budget-friendly, delicious, and versatile enough for everyday meals.
Ingredients
For the Bread
- 3½ cups (440 g) all-purpose flour or bread flour
- 1½ teaspoons salt
- 1 teaspoon sugar (optional, helps activate yeast)
- 2 teaspoons instant dry yeast
- 1½ cups (360 ml) warm water (about 38–40°C / 100–105°F)
Optional Herb Topping
- 1 tablespoon olive oil
- 1 teaspoon dried rosemary
- 1 teaspoon dried thyme
- 1 teaspoon dried oregano
- 1 teaspoon garlic powder
- Flaky sea salt for sprinkling
Equipment Needed
- Large mixing bowl
- Wooden spoon or silicone spatula
- Plastic wrap or clean kitchen towel
- Dutch oven or baking dish with lid
- Parchment paper
- Sharp knife or bread lame
Preparation Time
- Prep Time: 10 minutes
- Rising Time: 2–3 hours (or overnight for extra flavor)
- Baking Time: 40–45 minutes
- Total Time: About 3½ hours
Step-by-Step Instructions
Step 1: Mix the Dough
In a large mixing bowl, combine the flour, salt, sugar, and yeast. Pour in the warm water and stir until everything comes together into a sticky dough. There’s no need to knead—it should look shaggy and slightly wet.
Step 2: First Rise
Cover the bowl with plastic wrap or a clean towel. Let the dough rise at room temperature for 2–3 hours, or until doubled in size. For deeper flavor, refrigerate the dough overnight and bake the next day.
Step 3: Shape the Dough
Lightly flour your work surface and gently transfer the dough. Fold the edges toward the center a few times to create a rough round loaf. Avoid pressing out all the air bubbles.
Place the dough on parchment paper and let it rest for another 30–45 minutes.
Step 4: Preheat the Oven
Place your Dutch oven (with lid) inside the oven and preheat to 230°C (450°F) for at least 30 minutes.
A hot baking vessel helps create the perfect crispy crust.
Step 5: Add Herbs
Brush the top of the loaf lightly with olive oil. Sprinkle rosemary, thyme, oregano, garlic powder, and flaky sea salt over the surface. Use a sharp knife to score the top with one or two shallow cuts.
Step 6: Bake
Carefully place the dough (with parchment paper) into the hot Dutch oven.
Bake:
- 30 minutes covered
- 10–15 minutes uncovered until deep golden brown
The loaf should sound hollow when tapped on the bottom.
Step 7: Cool
Transfer the bread to a wire rack and allow it to cool for at least 30 minutes before slicing.
Baking Methods
Dutch Oven Method
Produces the crispiest crust by trapping steam.
Baking Stone Method
Bake on a preheated stone with a tray of hot water underneath for steam.
Regular Baking Tray
Bake on parchment with a pan of boiling water in the oven to create moisture.
Loaf Pan
For sandwich-style bread, shape the dough into a log and bake in a greased loaf pan.
Tips for Perfect Bread
- Use warm—not hot—water.
- Don’t add too much extra flour.
- Let the bread cool completely before slicing.
- Bread flour creates a chewier texture.
- Longer fermentation creates richer flavor.
Flavor Variations
- Cheddar Cheese and Herbs
- Garlic Parmesan
- Olive and Rosemary
- Jalapeño Cheddar
- Sun-Dried Tomato Basil
- Everything Bagel Seasoning
- Sesame Seed Crust
- Whole Wheat Blend
Nutritional Information (Approximate Per Slice)
- Calories: 145
- Protein: 5 g
- Carbohydrates: 29 g
- Fat: 1.5 g
- Fiber: 1.5 g
- Sodium: 210 mg
The History of No-Knead Bread
No-knead bread has roots in traditional European peasant baking, where simple ingredients and long fermentation were used to create flavorful loaves without intensive labor. In modern times, the technique became widely popular because it allows home bakers to achieve artisan-quality bread with very little effort. The extended resting period naturally develops gluten, producing an airy crumb and crisp crust that rivals bakery bread.
Formation and Texture
The long fermentation allows gluten strands to form naturally, creating a light, open crumb filled with irregular air pockets. Steam generated during baking helps the loaf expand dramatically, while the hot baking vessel produces a beautifully caramelized, crackling crust. The result is a rustic loaf that is crisp on the outside, soft and chewy on the inside, and full of rich, homemade flavor.
Serving Suggestions
- Serve warm with butter or olive oil.
- Pair with soups and stews.
- Make grilled cheese sandwiches.
- Toast for breakfast with jam or honey.
- Serve alongside pasta dishes.
- Use for garlic bread.
- Slice for avocado toast.
- Enjoy with cheese boards and charcuterie.
Storage
- Store in a paper bag or bread box for up to 3 days.
- Freeze sliced bread for up to 3 months.
- Reheat in the oven for 5–10 minutes to refresh the crust.
Why People Love This Recipe
Home bakers adore this bread because it’s incredibly simple, affordable, and consistently delicious. It requires no special skills, no kneading, and only a few pantry ingredients, yet the finished loaf has the appearance and taste of artisan bakery bread. The crispy crust, fluffy interior, and endless customization options make it a favorite for families, beginners, and experienced bakers alike.
Conclusion
This easy no-knead homemade bread is proof that making fresh bread doesn’t have to be difficult or expensive. With no eggs, no butter, and no kneading required, anyone can bake a rustic loaf with a crisp golden crust and a soft, airy center. Whether enjoyed fresh from the oven, toasted for breakfast, or served with your favorite meal, this recipe is one you’ll come back to again and again. Once you taste homemade bread this good, you may never want to buy store-bought bread again.