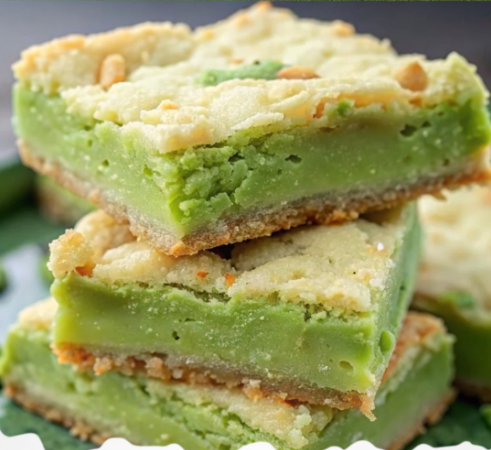
If you love the rich, nutty flavor of pistachios, these Pistachio Dream Cookie Bars will become your new favorite dessert! With a buttery shortbread crust, a luscious pistachio pudding filling, and a light whipped topping, these bars are creamy, dreamy, and irresistibly delicious.
Perfect for potlucks, holidays, or just a sweet treat at home, this recipe is easy to make but looks and tastes gourmet. Below, you’ll find step-by-step instructions, helpful tips, and variations to customize your bars.
Why You’ll Love This Recipe
✅ No-bake filling (only the crust needs baking!)
✅ Soft, creamy texture with a satisfying crunch from pistachios
✅ Easy to make ahead—great for parties and gatherings
✅ Customizable—add white chocolate, caramel, or different nuts
Ingredients & Substitutions
For the Shortbread Crust:
- 1 cup all-purpose flour – For a gluten-free version, use a 1:1 gluten-free flour blend.
- ½ cup unsalted butter, softened – Salted butter works too, but omit any extra salt.
- ¼ cup powdered sugar – Adds sweetness without graininess.
For the Pistachio Cream Layer:
- 1 (3.4 oz) box instant pistachio pudding mix – Must be instant (not cook & serve).
- 1 cup cold milk – Whole milk makes it creamier, but 2% or almond milk works too.
- 1 (8 oz) tub whipped topping (Cool Whip), thawed – Homemade whipped cream can be used instead.
For Topping & Variations:
- ½ cup chopped pistachios – For crunch and extra pistachio flavor.
- Green food coloring (optional) – Enhances the color if desired.
- White chocolate chips or drizzle – Adds sweetness and contrast.
- A pinch of cardamom or rose water – For a Middle Eastern-inspired twist.
Step-by-Step Instructions
Step 1: Make the Shortbread Crust
- Preheat oven to 350°F (175°C).
- Mix crust ingredients – In a bowl, combine flour, softened butter, and powdered sugar until crumbly.
- Press into pan – Line an 8×8-inch or 9×9-inch baking dish with parchment paper (for easy removal). Press the dough evenly into the bottom.
- Bake for 15-18 minutes until lightly golden. Let it cool completely before adding the filling.
💡 Tip: If the crust puffs up while baking, gently press it down with a spoon while still warm.
Step 2: Prepare the Pistachio Cream Filling
- Whisk pudding mix & milk – In a bowl, combine the instant pistachio pudding mix and cold milk. Whisk for 2 minutes until thick.
- Fold in whipped topping – Gently mix in the thawed Cool Whip until smooth. For a brighter green color, add 1-2 drops of green food coloring.
- Spread over crust – Pour the pistachio cream over the cooled crust and smooth the top with a spatula.
Step 3: Chill & Add Toppings
- Refrigerate for at least 2 hours (or overnight) to set.
- Sprinkle chopped pistachios on top before serving.
- Optional drizzle – Melt white chocolate and drizzle over the bars for extra decadence.
Step 4: Slice & Serve!
- Use a sharp knife to cut into squares or bars.
- Store leftovers in the fridge for up to 4 days.
Expert Tips for the Best Results
🔹 Use cold milk – This helps the pudding set properly.
🔹 Let the crust cool completely – If it’s warm, the filling will melt and become runny.
🔹 For cleaner cuts, dip your knife in hot water before slicing.
🔹 Make it nuttier – Toast the pistachios before sprinkling for extra flavor.
Variations to Try
🍫 Chocolate Pistachio Bars – Add a layer of chocolate ganache under the pistachio cream.
🍓 Berry Pistachio Bars – Top with fresh raspberries or strawberries.
🌹 Rose Pistachio Bars – Add ½ tsp rose water to the filling for a floral touch.
🍋 Lemon-Pistachio Bars – Mix lemon zest into the crust for a citrusy twist.
FAQs
Can I use homemade whipped cream instead of Cool Whip?
Yes! Whip 1 cup heavy cream + 2 tbsp powdered sugar until stiff peaks form, then fold into the pudding.
Can I freeze these bars?
Yes! Freeze in an airtight container for up to 1 month. Thaw in the fridge before serving.
Why is my filling too runny?
- You may have used cook & serve pudding instead of instant.
- The crust wasn’t fully cooled before adding the filling.
Final Thoughts
These Pistachio Dream Cookie Bars are a perfect balance of buttery, creamy, and nutty flavors. Whether you’re serving them at a party or enjoying them as an afternoon treat, they’re sure to impress!
Will you try this recipe? Let me know in the comments! 😊
Would you like a video tutorial or a printable recipe card for this? I’d be happy to help! 🎥📝