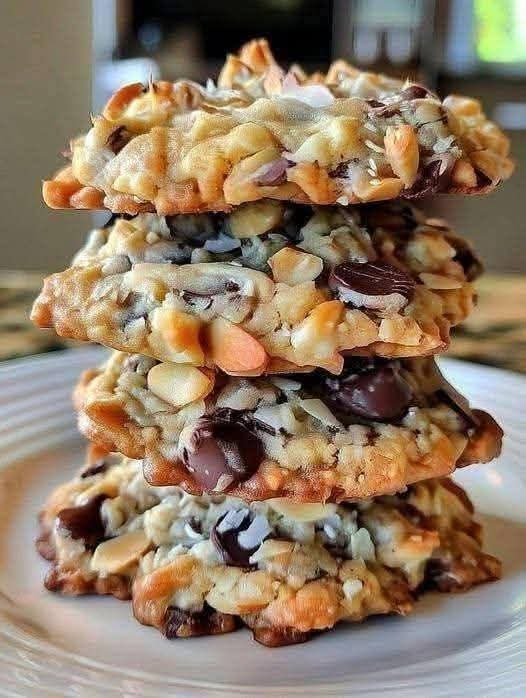
Get ready to enjoy these delicious Loaded Chocolate Chip & Mixed Nut Cookies! These homemade cookies are packed with crunchy almonds, cashews, walnuts, and rich chocolate chips in every bite. They’re golden around the edges, slightly soft in the center, and filled with an irresistible combination of buttery cookie dough, roasted nuts, and melted chocolate. 😍
If you love cookies that are loaded with delicious ingredients, this recipe is perfect for you! Each cookie is generously packed with crunchy nuts and chocolate chunks, creating a beautiful homemade treat that looks just as amazing as it tastes.
These cookies are perfect for afternoon snacks, holiday cookie platters, bake sales, lunchboxes, or sharing with family and friends. They’re also wonderful with a cold glass of milk, a cup of coffee, or hot chocolate.
The best part? You don’t need any special equipment or complicated techniques. With simple pantry ingredients and a little preparation, you can make a batch of bakery-style cookies right in your own kitchen!

🛒 Ingredients
For the cookie dough:
- 1 cup (225 g) unsalted butter, softened
- ¾ cup (150 g) granulated white sugar
- ¾ cup (165 g) packed light brown sugar
- 2 large eggs, room temperature
- 2 teaspoons pure vanilla extract
- 2¾ cups (345 g) all-purpose flour
- 1 teaspoon baking soda
- ½ teaspoon baking powder
- ½ teaspoon salt
- 1 tablespoon cornstarch (optional, for a softer center)
For the nuts and chocolate:
- ½ cup (65 g) whole almonds, roughly chopped
- ½ cup (60 g) cashews, roughly chopped
- ½ cup (55 g) walnuts or pecans, chopped
- ¼ cup (25 g) sliced almonds
- 1 cup (175 g) semi-sweet chocolate chips
- ½ cup (85 g) dark chocolate chunks
- ¼ cup (40 g) milk chocolate chips (optional)
Optional toppings:
- A handful of extra chopped nuts
- Extra chocolate chips
- A pinch of flaky sea salt
- 1 tablespoon chopped roasted almonds
👩🍳 Instructions
1. Prepare the nuts
Start by preparing all your nuts. Roughly chop the almonds, cashews, and walnuts into small and medium-sized pieces.
You don’t want to chop everything too finely because the beautiful appearance of these cookies comes from having visible pieces of nuts throughout the dough.
If you want an even richer flavor, lightly toast the nuts in a dry skillet over medium-low heat for approximately 3–5 minutes, stirring frequently. This helps release their natural aroma and gives the finished cookies a wonderful roasted flavor.
Remove the nuts from the skillet and allow them to cool completely before adding them to the cookie dough.
Keep a small handful of whole or sliced nuts aside for decorating the tops of the cookies later.
2. Mix the butter and sugars
In a large mixing bowl, add the softened butter, granulated sugar, and brown sugar.
Using a hand mixer or stand mixer, beat everything together for approximately 2–3 minutes until the mixture becomes creamy, smooth, and slightly fluffy.
The combination of white and brown sugar gives these cookies their delicious texture.
The granulated sugar helps create slightly crisp edges, while the brown sugar adds moisture, a caramel-like flavor, and a softer center.
Make sure the butter is softened but not melted. Melted butter can make the cookies spread too much during baking.
3. Add the eggs and vanilla
Add the eggs one at a time, mixing well after each addition.
Pour in the vanilla extract and continue mixing until everything is fully combined.
Scrape down the sides of the bowl with a spatula to make sure all the ingredients are evenly incorporated.
At this stage, the mixture should look creamy, smooth, and slightly thick.
The vanilla adds a wonderful aroma that complements both the toasted nuts and chocolate.
4. Combine the dry ingredients
In a separate medium-sized bowl, whisk together the all-purpose flour, baking soda, baking powder, salt, and cornstarch.
Mix the dry ingredients thoroughly so that the baking soda and baking powder are evenly distributed.
Gradually add the dry mixture to the butter mixture.
Mix on low speed or use a wooden spoon until a soft cookie dough forms.
Be careful not to overmix the dough. Once the flour disappears, stop mixing.
Overmixing can develop too much gluten and make the cookies tougher than desired.
The dough should be thick, soft, and easy to handle.
5. Add the mixed nuts
Now comes the delicious part!
Add the chopped almonds, cashews, walnuts, and sliced almonds to the cookie dough.
Use a spatula to gently fold everything together.
Make sure the nuts are distributed throughout the dough so every cookie gets a generous amount.
The mixture should look chunky and colorful, with pieces of nuts clearly visible.
This is what gives these cookies their beautiful homemade appearance and satisfying crunch.
6. Fold in the chocolate
Add the semi-sweet chocolate chips, dark chocolate chunks, and optional milk chocolate chips.
Gently fold them into the dough until evenly distributed.
Try to keep some larger chocolate pieces visible because they will create beautiful melted chocolate pockets when the cookies come out of the oven.
Reserve a few chocolate chips and chopped nuts for decorating the tops.
This little detail makes the cookies look more professional and bakery-style.
7. Chill the cookie dough
Cover the mixing bowl with plastic wrap and refrigerate the cookie dough for approximately 30–45 minutes.
Chilling is an important step because it helps the butter firm up and prevents the cookies from spreading too quickly during baking.
It also allows the flavors to develop, creating a richer and more delicious cookie.
If you have extra time, you can refrigerate the dough for up to 24 hours.
8. Shape the cookies
Preheat your oven to 350°F (175°C).
Line a large baking sheet with parchment paper.
Remove the chilled dough from the refrigerator.
Use a cookie scoop or your hands to divide the dough into approximately 12–16 equal portions, depending on how large you want your cookies.
Roll each portion gently into a ball, then place it onto the prepared baking sheet.
Leave approximately 2–3 inches of space between each cookie because they will spread slightly during baking.
For a chunky, rustic appearance like the cookies in the picture, gently press extra chopped nuts and chocolate chips onto the outside of each dough ball.
You can also slightly flatten the dough balls if you prefer wider cookies.
9. Bake until golden
Place the baking sheet in the preheated oven.
Bake for approximately 11–14 minutes, depending on the size of your cookies.
The edges should become lightly golden brown, while the centers should still look slightly soft.
Don’t wait until the entire cookie becomes dark brown. Cookies continue cooking slightly from the residual heat after being removed from the oven.
For extra-large cookies, you may need approximately 14–16 minutes.
Keep an eye on them during the final minutes to avoid overbaking.
10. Give the cookies their final touch
As soon as the cookies come out of the oven, gently press a few extra chocolate chips and chopped nuts into the tops while they’re still warm.
This creates a beautiful bakery-style appearance.
If desired, sprinkle a tiny pinch of flaky sea salt over each cookie.
The slight saltiness balances the sweetness of the chocolate and enhances the flavor of the roasted nuts.
Let the cookies rest on the baking sheet for approximately 10 minutes before transferring them to a wire cooling rack.
They will become firmer as they cool while keeping their deliciously soft centers.
11. Cool and serve
Allow the cookies to cool completely, or enjoy one while it’s still slightly warm.
When you break one open, you should see a delicious combination of chocolate, almonds, and other crunchy nuts throughout the cookie.
Arrange the cookies on a serving plate and stack them for a beautiful presentation.
Serve with cold milk, coffee, tea, or your favorite hot chocolate.
Enjoy every crunchy, chocolate-filled bite! ❤️
🍽️ Serving Suggestions
These Loaded Chocolate Chip & Mixed Nut Cookies are incredibly versatile and can be enjoyed in many different ways.
Here are some delicious serving ideas:
1. With a glass of cold milk
A classic combination! The creamy milk pairs perfectly with the rich chocolate and crunchy nuts.
2. With coffee or espresso
Enjoy one or two cookies with your morning coffee or afternoon espresso. The roasted nut flavors complement coffee beautifully.
3. With vanilla ice cream
Serve a slightly warm cookie alongside a scoop of vanilla ice cream. The contrast between warm chocolate and cold, creamy ice cream is absolutely delicious.
4. As a dessert platter
Arrange the cookies on a large serving plate with brownies, mini muffins, and other homemade treats. They’re perfect for parties, holidays, and family gatherings.
5. As homemade gifts
Place completely cooled cookies in a decorative tin or clear gift bag. Add a ribbon for a simple homemade gift that friends and family will appreciate.
💡 Pro Tips for Perfect Nut Cookies
- Toast your nuts: Lightly roasting the nuts before adding them to the dough gives them a deeper, richer flavor.
- Use different chocolate varieties: Combining dark, milk, and semi-sweet chocolate creates a more interesting flavor.
- Don’t overmix: Mix the flour just until incorporated to keep the cookies tender.
- Chill the dough: Refrigerating the dough helps control spreading and improves the texture.
- Use room-temperature eggs: They combine more easily with the butter and sugar mixture.
- Don’t overbake: Remove the cookies when their edges are golden but the centers still look slightly soft.
- Add toppings before baking: Pressing extra nuts and chocolate chips onto the dough makes the cookies look beautiful.
- Make them evenly sized: Using a cookie scoop helps all the cookies bake at approximately the same rate.
🥜 Easy Variations
One of the best things about this recipe is that you can customize it with your favorite ingredients.
Almond Chocolate Cookies: Use extra chopped almonds and dark chocolate for a rich, nutty flavor.
Cashew Chocolate Cookies: Replace the walnuts with roasted cashews for a slightly sweet and buttery taste.
Peanut Butter Chocolate Cookies: Add ¼ cup of creamy peanut butter to the butter mixture and replace some of the mixed nuts with roasted peanuts.
Cranberry Nut Cookies: Add ½ cup of dried cranberries for a delicious combination of sweet, tart, and crunchy flavors.
White Chocolate Nut Cookies: Replace some of the dark chocolate with white chocolate chips for a sweeter, creamier taste.
Extra Crunchy Cookies: Add additional chopped roasted almonds and reduce the brown sugar slightly for a less soft, more crisp texture.
🧊 Storage Instructions
To keep your homemade cookies fresh and delicious, allow them to cool completely before storing.
- Room temperature: Store in an airtight container for up to 5 days.
- Refrigerator: Store in a sealed container for up to 1 week.
- Freezer: Freeze baked cookies for up to 3 months.
- Cookie dough: Shape the dough into balls and freeze them in a freezer-safe container for up to 2–3 months.
When you’re ready to enjoy frozen baked cookies, let them thaw at room temperature.
You can also warm them in the microwave for approximately 10–15 seconds to soften the chocolate and bring back that freshly baked taste.
❤️ Final Thoughts
These Loaded Chocolate Chip & Mixed Nut Cookies are the perfect homemade treat for anyone who loves rich chocolate, crunchy nuts, and delicious buttery cookies.
Every bite offers something special: golden edges, a soft and satisfying center, crunchy almonds and cashews, and generous pieces of melted chocolate.
They’re easy enough to prepare for an ordinary afternoon but beautiful enough to serve at special occasions.
Whether you’re baking them for your family, sharing them with friends, preparing a dessert table, or simply satisfying your sweet tooth, these cookies are guaranteed to be a wonderful addition to your homemade baking collection.
Make a batch, enjoy the amazing aroma filling your kitchen, and don’t forget to save a few for later!
One cookie is never enough! 🍪🍫❤️