

Introduction
Sweet, buttery Pecan Pralines are a classic Southern candy that brings together the rich flavor of toasted pecans, creamy butter, brown sugar, and a wonderful caramel-like sweetness. Each bite is packed with crunchy pecans surrounded by a soft, melt-in-your-mouth candy that tastes like something straight from an old-fashioned Southern candy shop.
These homemade pralines are perfect for holiday dessert trays, family gatherings, homemade gifts, potlucks, or simply enjoying with a cup of coffee. Their beautiful golden-brown color and irresistible buttery aroma make them a treat that is difficult to resist.
The best part? You don’t need complicated ingredients or special candy-making equipment. With a little patience, a heavy saucepan, and a candy thermometer if you have one, you can make delicious pecan pralines right in your own kitchen.
Ingredients
Yield: approximately 18–24 pralines | Preparation: 10 minutes | Cooking: 15–20 minutes | Setting: 30–60 minutes

2 cups pecan halves
The star ingredient! Use fresh pecans for a rich, nutty flavor and a satisfying crunch.

1 cup packed light brown sugar
Provides a deep caramel flavor and classic praline sweetness.

1 cup granulated sugar
Helps the candy develop its traditional texture as it cools.

½ cup heavy cream
Creates a rich, creamy candy mixture.

4 tablespoons unsalted butter
Gives the pralines their signature buttery taste.

1 teaspoon vanilla extract
Adds warmth and enhances the caramel flavor.

¼ teaspoon salt
Balances the sweetness and brings out the pecan flavor.
Instructions
Step 1: Prepare your workspace
Line a baking sheet with parchment paper or a silicone baking mat. Make sure you have a large spoon ready and all your ingredients measured before you begin cooking.
Pralines can change texture quickly once the candy mixture is ready, so preparation makes the process much easier.
Step 2: Toast the pecans
For an extra-rich flavor, place the pecans in a dry skillet over medium-low heat for approximately 3–5 minutes, stirring frequently.
When they become fragrant, remove them from the heat and allow them to cool slightly. Be careful not to burn them, as pecans can turn bitter quickly.
Toasting is optional, but it adds a wonderful depth of flavor.
Step 3: Combine the sugars and cream
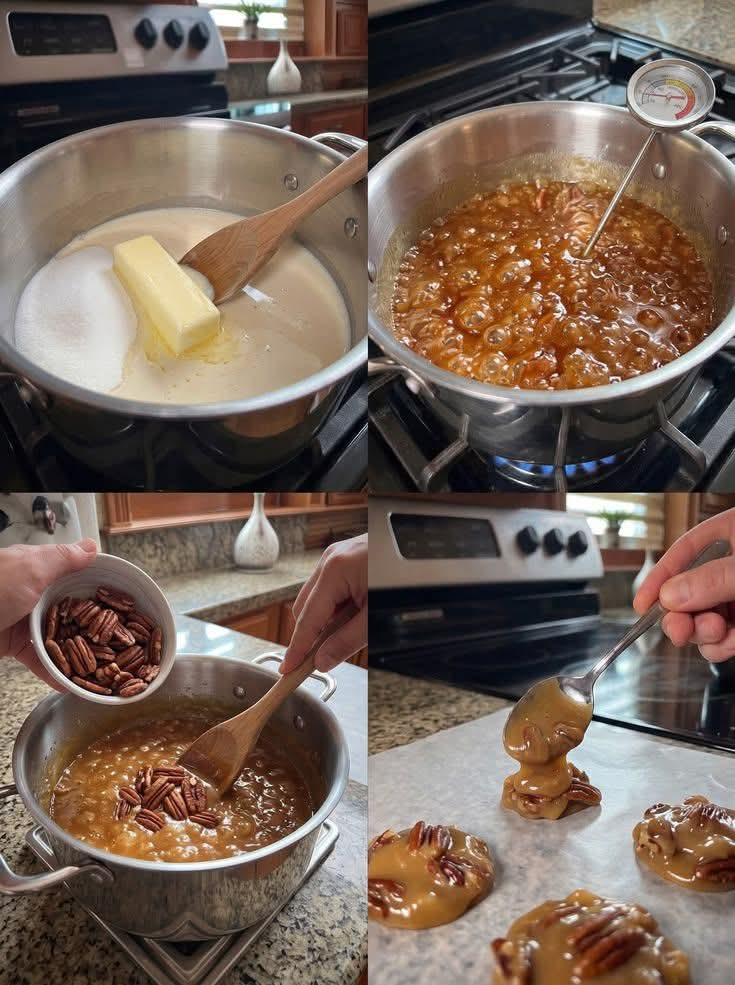
Place the brown sugar, granulated sugar, heavy cream, butter, and salt into a heavy-bottomed saucepan.
Set the saucepan over medium heat and stir gently until the butter melts and the sugars begin to dissolve.
Continue heating until the mixture comes to a steady boil. Avoid scraping crystallized sugar from the sides of the pan back into the mixture.
Step 4: Cook the candy mixture
Allow the mixture to boil, stirring occasionally and monitoring the temperature carefully.
For traditional soft pralines, aim for approximately 236–240°F (113–116°C), often called the soft-ball stage. A candy thermometer is particularly helpful here.
Remove the pan from the heat once the mixture reaches the target temperature.
Important: Hot sugar syrup can cause severe burns. Keep children away from the stove, and never taste the mixture while it is hot.
Step 5: Add the pecans and vanilla
Let the mixture rest briefly, then add the vanilla extract and toasted pecans.
Stir vigorously with a sturdy wooden spoon until the mixture begins to thicken, lose some of its glossy appearance, and become slightly cloudy.
This step helps create the familiar creamy texture of pralines rather than a thin caramel coating.
Step 6: Spoon out the pralines
Working quickly, drop spoonfuls of the mixture onto the prepared baking sheet.
Make each portion roughly 2–3 inches wide, leaving space between the candies. If the mixture becomes too stiff to scoop, you may gently warm it over very low heat for a few seconds.
Step 7: Allow them to set
Leave the pralines undisturbed at room temperature for approximately 30–60 minutes, or until firm enough to lift from the parchment.
The finished candy should have a delicate outer surface and a rich, slightly crumbly or creamy interior filled with pecans.
Step 8: Serve and enjoy
Transfer the cooled pralines to a serving plate or arrange them in small candy wrappers. Enjoy them with coffee, tea, or a glass of cold milk.
For homemade gifts, place completely cooled pralines in a decorative tin lined with parchment paper.
Methods and techniques for perfect pralines


1. The traditional stovetop method
This is the classic method for making pralines. Heating sugar, cream, and butter to the correct temperature allows the candy to set with a distinctive texture. Once the pecans are added, stirring helps the mixture cool and thicken before it is portioned.
2. The temperature-control method
A candy thermometer helps remove the guesswork. If the mixture is undercooked, the pralines may remain too soft or sticky. If it is overcooked, they may become hard, dry, or crumbly.
Humidity can also affect candy-making, so a dry day is often easier for making pralines.
3. The flavor-enhancing method
Toasted pecans, good-quality vanilla, and real butter make a noticeable difference. For an extra-special variation, you can add a tiny pinch of cinnamon or use a small amount of dark brown sugar for a deeper molasses flavor.
4. The cooling method
Do not refrigerate the pralines immediately to speed up the process. Allowing them to cool naturally helps the candy develop its intended texture.
History of pecan pralines

Pralines have a long history rooted in European confectionery traditions. Early pralines were associated with French cooking and were often made with almonds coated in caramelized sugar.
When French culinary traditions reached Louisiana, cooks adapted the candy using locally available ingredients. Pecans, native to North America, became a natural substitute for almonds, and cream and butter helped create the rich, softer candy now associated with the American South.
Pecan pralines became especially well known in Louisiana, particularly New Orleans, where they are sold in candy shops and enjoyed by visitors and locals alike.
Over generations, families developed their own versions, adjusting the amount of sugar, cream, butter, and nuts to create their preferred texture. Today, pecan pralines remain a beloved homemade confection and a popular edible gift.
Formation: How pecan pralines develop their texture
The magic of pralines happens as the sugar mixture heats and then cools.
- During heating: Sugar dissolves in the cream and butter, creating a smooth syrup.
- During cooking: Water evaporates, concentrating the sugar mixture and bringing it to the soft-ball stage.
- During stirring: The mixture cools and begins forming tiny sugar crystals, which help give pralines their characteristic creamy, slightly grainy texture.
- During setting: The candy firms around the pecans, creating a sweet coating with a rich, nutty center.
The goal is to balance temperature and stirring. Too little cooling or stirring may leave the candy overly glossy and sticky, while excessive crystallization can make it dry and crumbly.
Tips for success
- Use fresh pecans for the best flavor.
- Measure ingredients before starting.
- Choose a heavy-bottomed saucepan to reduce the risk of scorching.
- Use a candy thermometer for reliable results.
- Avoid making pralines on an extremely humid day when possible.
- Work quickly once the mixture begins thickening.
- If the candy hardens in the pan, gently rewarm it over low heat rather than adding large amounts of liquid.
- Let the pralines cool completely before stacking or packaging them.
Delicious variations

Chocolate pecan pralines
Stir in 2–3 tablespoons of cocoa powder with the dry ingredients, or drizzle the cooled candies with melted chocolate.

Salted caramel pralines
Finish each candy with a tiny pinch of flaky sea salt to balance the sweetness.

Cinnamon pecan pralines
Add ¼ teaspoon of ground cinnamon for a warm, cozy flavor that is especially lovely during the holidays.
Extra-nutty pralines
Replace part of the pecan halves with chopped pecans for more nuts in every bite.
Serving and storage
Pecan pralines are wonderful served on dessert platters alongside cookies, brownies, fudge, and other homemade sweets. They also make thoughtful gifts for birthdays, Thanksgiving, Christmas, and family celebrations.
Store the completely cooled pralines in an airtight container at room temperature in a cool, dry place for about 5–7 days for best quality. Separate layers with parchment paper to prevent sticking. If your kitchen is hot or humid, keep them in a cool, airtight environment and check their texture before serving.
Conclusion
These sweet, buttery pecan pralines are proof that a few simple ingredients can create something truly special. With their rich caramel sweetness, creamy texture, and generous amount of crunchy pecans, they bring old-fashioned Southern charm to any occasion.
Whether you’re making them for your family, sharing them with friends, preparing a holiday candy tray, or wrapping them up as homemade gifts, these pralines are a delicious way to turn an ordinary day into a special one.
The secret is simple: use good pecans, watch the temperature carefully, and give the candy time to set. Once you master the technique, you may find yourself making these irresistible treats again and again.
For the praline lovers ❤️
If you love the combination of buttery caramel, toasted pecans, and homemade candy, this recipe deserves a place in your family recipe collection. Every piece is sweet, nutty, and full of old-fashioned goodness.
Serve them at your next gathering and watch how quickly the plate empties!
A little question for fellow dessert lovers: Do you prefer your pecan pralines soft and creamy, or slightly firm with a crumbly sugar texture?
Either way, homemade pecan pralines are a timeless treat worth sharing. 💛