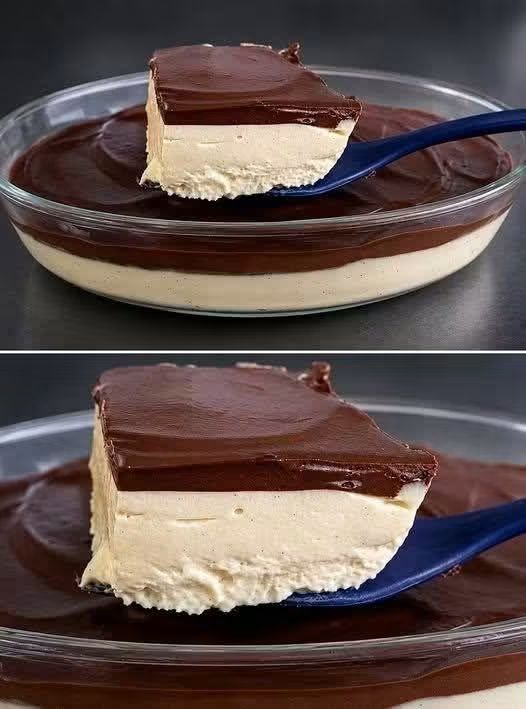

This creamy no-bake dessert features two irresistible layers: a light, smooth peanut butter cheesecake filling and a rich chocolate ganache topping. It has a silky texture, a deep chocolate flavor, and a delicious balance of sweet and salty notes.
Inspired by the dessert in your picture, this recipe requires no oven and is served chilled. It is ideal for family gatherings, dinner parties, birthdays, or whenever you want a beautiful homemade dessert without complicated baking techniques.
The pale filling resembles a whipped peanut butter cream cheese mousse, while the dark chocolate topping creates a smooth, glossy finish. You can prepare it in one large glass dish, as shown in the picture, or divide it into individual dessert cups.
Recipe Information
- Preparation time: 20–25 minutes
- Chilling time: 4–6 hours, preferably overnight
- Total time: Approximately 5 hours
- Servings: 8–10 portions
- Difficulty: Easy
- Cooking method: No-bake
- Main flavors: Peanut butter, cream cheese, and chocolate
Ingredients

For the creamy peanut butter layer
- 400 g cream cheese, softened
- 200 g smooth peanut butter
- 100 g powdered sugar
- 1 teaspoon vanilla extract
- 300 ml cold heavy whipping cream, at least 30–35% fat
- A small pinch of salt, optional

For the chocolate topping
- 200 g dark or semisweet chocolate
- 150 ml heavy cream
- 15 g unsalted butter, optional, for extra shine

Optional biscuit base
The dessert in your picture appears to have a creamy bottom rather than a clearly visible biscuit crust, so this base is optional.
- 200 g digestive biscuits or graham crackers
- 80 g melted unsalted butter
Ingredient note: Use regular, smooth peanut butter for the best consistency. If your peanut butter is already very sweet, reduce the powdered sugar slightly. For a firmer filling, use full-fat cream cheese and properly whipped cream.
Instructions and Preparation Method

Step 1: Prepare the optional biscuit base
If you want a crunchy base, place the biscuits in a food processor and blend until finely crushed. You can also put them in a sealed bag and crush them with a rolling pin.
Mix the crumbs with melted butter until the texture resembles damp sand. Press the mixture firmly into the bottom of a glass dish or springform pan. Refrigerate for 15–20 minutes to help it set.
If you prefer a dessert exactly like the smooth, layered appearance in the reference picture, skip this step and prepare the filling directly.

Step 2: Prepare the cream cheese mixture
Place the softened cream cheese in a large mixing bowl. Beat it with an electric mixer on medium speed until completely smooth and creamy.
Add the powdered sugar, vanilla extract, and a pinch of salt if desired. Continue mixing until everything is incorporated and no lumps remain.
Scrape down the sides of the bowl with a spatula. A smooth cream cheese mixture at this stage will help produce the silky texture visible in the finished dessert.

Step 3: Add the peanut butter
Add the smooth peanut butter to the cream cheese mixture. Beat on medium speed until the mixture becomes uniform, thick, and pale beige.
Taste a small amount and adjust the sweetness if necessary. The peanut butter should be noticeable without overpowering the cream cheese.
If the mixture seems very thick, do not worry. The whipped cream added in the next step will lighten it and create the airy, mousse-like consistency needed for this dessert.

Step 4: Whip the heavy cream
Pour the cold heavy whipping cream into a separate, clean bowl. Using an electric mixer, beat it until medium-stiff peaks form.
The cream should hold its shape when you lift the beaters, but it should not become grainy or turn into butter.
For best results, chill the bowl and beaters for about 10 minutes before whipping. Cold cream whips more easily and helps the filling maintain its structure.

Step 5: Combine the filling
Add approximately one-third of the whipped cream to the peanut butter mixture and stir gently to loosen it.
Fold in the remaining whipped cream in two additions using a spatula. Use slow, sweeping movements from the bottom of the bowl to the top.
Avoid vigorous mixing because it can deflate the whipped cream and make the filling less airy. Continue folding just until the mixture is smooth and evenly colored.

Step 6: Fill the serving dish
Spoon the peanut butter mixture into your glass dish, spreading it evenly with a spatula. Gently tap the dish against the countertop to remove large air pockets.
Smooth the top so the chocolate layer will sit evenly on the filling. Cover the dish and refrigerate for at least 30–60 minutes before adding the ganache.
Chilling at this stage helps the filling firm up slightly and reduces the risk of the chocolate mixing into the pale layer.

Step 7: Make the chocolate ganache
Finely chop the chocolate and place it in a heatproof bowl. Heat the cream in a small saucepan over medium-low heat until steaming and just beginning to simmer around the edges. Do not boil it vigorously.
Pour the hot cream over the chopped chocolate and leave it undisturbed for 2–3 minutes. Stir gently from the center outward until the chocolate melts into a smooth, glossy mixture.
Add the optional butter and stir until incorporated. Allow the ganache to cool until it is lukewarm and pourable, rather than hot.

Step 8: Add the chocolate topping
Remove the chilled dish from the refrigerator. Slowly pour the cooled ganache over the peanut butter filling.
Tilt the dish gently so the chocolate spreads toward the edges, or use an offset spatula to create an even surface.
If the filling is still soft, pour the chocolate slowly and carefully to avoid disturbing the layers. Let the ganache settle for a few minutes before covering the dish.

Step 9: Chill until set
Cover the dish without touching the chocolate surface and refrigerate for at least 4–6 hours. For the cleanest slices and the best texture, leave it overnight.
The peanut butter filling will become firmer, and the chocolate topping will set into a smooth layer.
When ready to serve, use a clean, sharp knife dipped in warm water and wiped dry between cuts. For a spoon-served dessert like the picture, simply scoop portions into dessert bowls.
Tips for the Perfect Texture
The most important part of this recipe is achieving a filling that is creamy but firm enough to hold its shape. Follow these tips for the best result.
- Use softened cream cheese: Cold cream cheese can form lumps that are difficult to remove once the other ingredients are added.
- Keep the whipping cream cold: Warm cream will not whip properly and may produce a loose filling.
- Fold instead of beating: Gentle folding preserves the air in the whipped cream and makes the texture lighter.
- Cool the ganache before pouring: Hot chocolate can melt the surface of the filling and cause the two layers to blend together.
- Allow enough chilling time: Four to six hours is a minimum guideline, and overnight chilling generally gives a better result.
- Choose the right chocolate: Semisweet chocolate creates a balanced flavor, while dark chocolate gives the dessert a richer, less sweet finish.
If your filling remains too soft after chilling, it may be because the cream was not whipped sufficiently or the cream cheese mixture was too warm. Return the dish to the refrigerator for additional chilling before serving.
Delicious Variations


1. Chocolate peanut butter cheesecake: Add 1–2 tablespoons of cocoa powder to the filling for a chocolate-flavored cream layer.
2. Crunchy peanut butter dessert: Sprinkle chopped roasted peanuts between the filling and ganache for extra texture.
3. Oreo version: Replace the digestive biscuit base with crushed chocolate sandwich cookies and melted butter.
4. Individual dessert cups: Divide the filling among small glasses, add the chocolate topping, and chill. These portions are attractive for parties and easier to serve.
5. Salted chocolate version: Finish the ganache with a tiny pinch of flaky sea salt. The salt enhances the chocolate flavor and balances the sweetness.
6. Caramel variation: Drizzle a small amount of caramel sauce over the filling before adding the chocolate layer. Use a thin layer so the dessert still sets properly.
Serving Suggestions
This dessert is rich, so relatively small portions are often enough. Serve it straight from the refrigerator for a firm, refreshing texture.
For an elegant presentation, use a transparent glass dish that shows off the contrasting beige and dark chocolate layers. You can decorate the top with finely chopped peanuts, chocolate curls, a light dusting of cocoa powder, or a few thin chocolate shavings.
Pair it with black coffee, espresso, or unsweetened tea. The slight bitterness of these drinks complements the sweet, creamy dessert.
For a special occasion, serve each portion on a small dessert plate with a few chocolate curls and a light drizzle of chocolate sauce. If you want the clean, dramatic look shown in the picture, keep the decoration minimal and let the two layers stand out.
Storage and Food Safety
Because this dessert contains cream cheese and whipped cream, it must remain refrigerated.
- Store it in a covered container in the refrigerator at 4°C (40°F) or below.
- For best quality, enjoy it within 3–4 days.
- Avoid leaving it at room temperature for more than two hours, or one hour when the temperature is above 32°C (90°F).
- You can freeze individual portions in airtight, freezer-safe containers for up to one month for best quality. Thaw them in the refrigerator before serving. The texture may become slightly less smooth after freezing.
Do not leave the dessert on the counter to soften for an extended period. It is best served chilled.
The Inspiration Behind This Dessert
No-bake layered desserts are popular because they offer the appearance and indulgence of a traditional cheesecake without requiring an oven. Cream cheese provides a tangy, rich foundation, while whipped cream adds lightness. Peanut butter introduces a roasted, nutty flavor that pairs naturally with chocolate.
The combination is inspired by the familiar pairing of chocolate and peanut butter found in candies, cookies, cakes, and other desserts. Bringing these flavors together in a chilled cheesecake-style dish creates a dessert that is both simple and impressive.
Unlike a traditional baked cheesecake, this version relies on refrigeration and the structure of whipped cream rather than eggs and oven heat. This makes it convenient for warm weather, small kitchens, and home cooks who want to prepare dessert in advance.
The recipe can also be adapted to different serving styles. A biscuit crust makes it more like a conventional no-bake cheesecake, while a crustless glass dish gives it a mousse-like appearance similar to the reference image.
Conclusion
This no-bake chocolate peanut butter cheesecake is an excellent choice when you want a creamy, chocolatey dessert without complicated baking. Its smooth peanut butter filling contrasts beautifully with the glossy chocolate topping, creating a dessert that looks elegant and tastes indulgent.
With just a few simple ingredients, careful mixing, and enough refrigeration time, you can prepare a delicious treat for family and friends. Customize it with biscuits, roasted peanuts, chocolate curls, or caramel to make it your own.
The secret to success is simple: use full-fat cream cheese, whip the cream properly, fold gently, let the ganache cool, and refrigerate the dessert until completely set. The result is a rich, silky, two-layer dessert that is ready to impress at any occasion. 🍫🥜
8