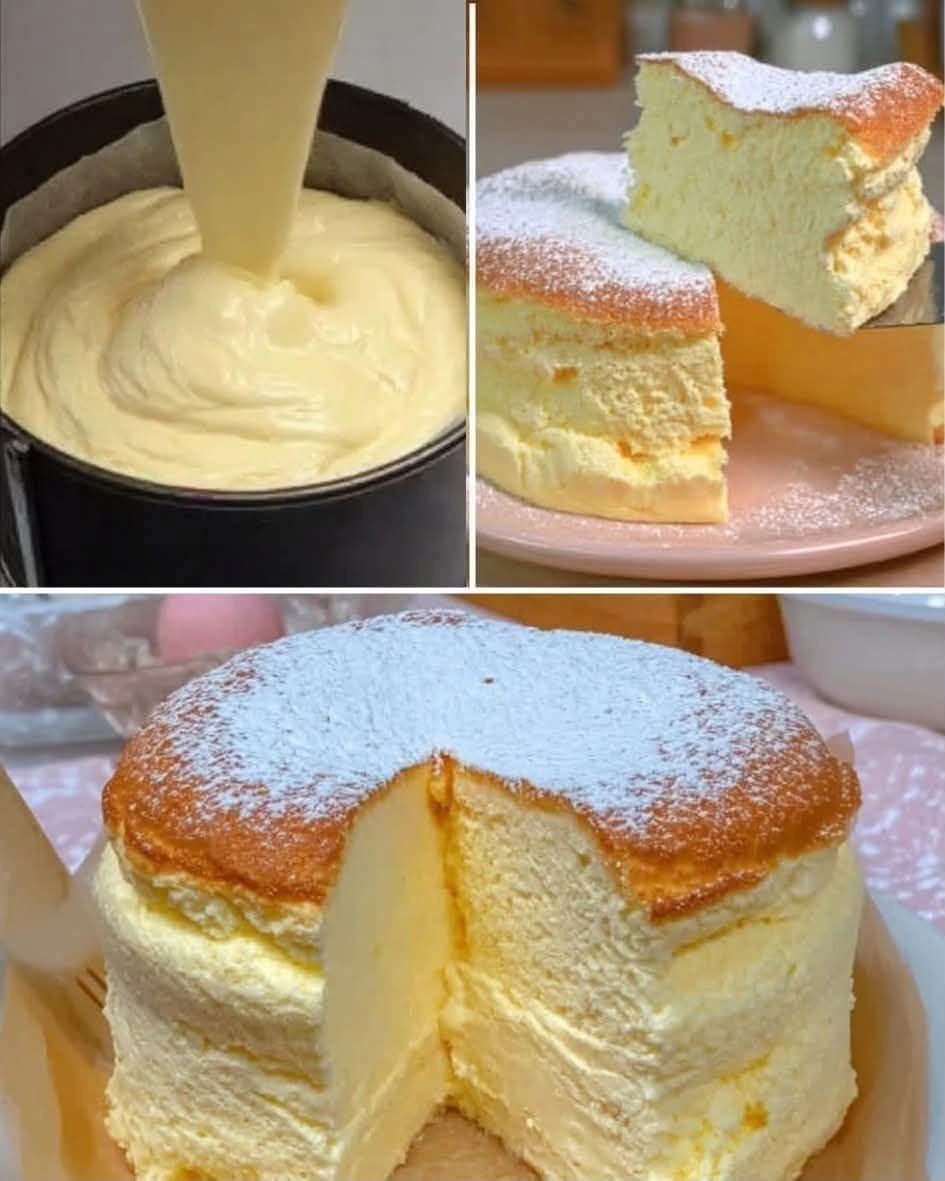
This beautiful cake has a soft golden top, an incredibly light interior, and a delicate texture that almost melts in your mouth. From the picture, it looks like a tall, airy Japanese-style cotton cheesecake: lighter than a traditional New York cheesecake and softer than a regular sponge cake.
The secret is in the way the eggs are incorporated and in baking the cake gently in a water bath. The result is a cake that rises beautifully in the oven, develops a lightly golden surface, and has a wonderfully tender center.
🧾 Ingredients
For the Cake
- 250 g cream cheese, softened
- 50 g unsalted butter
- 100 ml whole milk
- 6 large eggs, separated
- 100 g granulated sugar
- 60 g cake flour
- 20 g cornstarch
- 1 teaspoon vanilla extract
- 1 tablespoon fresh lemon juice
- 1 teaspoon finely grated lemon zest
- ¼ teaspoon salt
For the Top
- Powdered sugar, for dusting
Equipment
- 8-inch (20 cm) round cake pan
- Large roasting pan for the water bath
- Electric hand mixer or stand mixer
- Mixing bowls
- Fine-mesh sieve
- Parchment paper
- Aluminum foil
- Spatula
1. Prepare the Cake Pan
Begin by preparing your cake pan carefully because this cake is very delicate.
Grease the inside of an 8-inch round cake pan lightly with butter. Line the bottom with parchment paper.
If your pan has a removable bottom, wrap the outside of the pan tightly with several layers of aluminum foil. This prevents water from the water bath from entering the pan.
For an especially tall cake like the one shown in the picture, you can also place a strip of parchment paper around the inside walls of the pan. Let the parchment extend slightly above the rim.
Set the prepared pan aside.
2. Separate the Eggs
Separate the six eggs while they are cold, placing the egg whites in a completely clean, dry mixing bowl.
Put the yolks in another bowl.
This step is extremely important because even a small amount of egg yolk or grease in the egg whites can prevent them from whipping properly.
Once separated, allow the eggs to come closer to room temperature.
Room-temperature egg whites generally whip more easily and can produce a stable, airy meringue.
3. Prepare the Cream Cheese Mixture
Place the softened cream cheese, butter, and milk in a heatproof bowl.
Set the bowl over a pot of gently simmering water, making sure the bottom of the bowl does not directly touch the water.
Warm the mixture gently while stirring.
The goal is not to boil it. You simply want the cream cheese and butter to melt together into a smooth mixture.
Continue stirring until the mixture becomes creamy and free of large lumps.
Remove it from the heat and allow it to cool slightly.
4. Add the Egg Yolks
Once the cream cheese mixture is warm rather than hot, add the egg yolks one at a time.
Whisk gently after each addition.
Add the vanilla extract, lemon juice, and lemon zest.
The lemon doesn’t make the cake strongly lemon-flavored. Instead, it helps balance the richness of the cream cheese and gives the finished cake a fresh aroma.
Mix until everything is smooth.
5. Sift the Dry Ingredients
Place the cake flour, cornstarch, and salt into a fine-mesh sieve.
Sift the dry ingredients into the cream cheese mixture.
This is an important step because it helps prevent lumps and creates a smoother batter.
Use a whisk to gently combine everything.
Do not overmix.
Stop as soon as the flour has disappeared and the batter looks smooth.
6. Prepare the Egg Whites
Now it’s time to make the meringue, which is responsible for the incredibly light texture of this cake.
Place the room-temperature egg whites in a clean mixing bowl.
Begin beating them at medium speed until they become foamy.
Gradually add the granulated sugar in three additions.
Continue beating until the egg whites become glossy and form soft to medium peaks.
Do not beat the whites until they become extremely stiff and dry.
The meringue should be smooth, shiny, and able to hold its shape while still looking soft.
This is one of the most important parts of the recipe.
7. Combine the Meringue and Cake Batter
Take about one-third of the whipped egg whites and add them to the cream cheese batter.
Use a spatula to gently fold them in.
This first portion can be mixed a little more thoroughly because it helps lighten the heavier cream cheese mixture.
Next, add another third of the meringue.
Fold gently from the bottom of the bowl upward.
Finally, add the remaining egg whites.
Continue folding carefully until the batter is evenly combined.
Avoid stirring aggressively because you don’t want to remove all the air that you worked to incorporate into the egg whites.
The finished batter should look smooth, pale, and fluffy.
8. Pour the Batter Into the Pan
Pour the batter slowly into the prepared cake pan.
Gently tap the pan once or twice on the counter to remove any large air bubbles.
Do not hit the pan repeatedly.
Use a spatula to smooth the surface.
At this point, the batter should have a thick but flowing consistency, similar to what is visible in the preparation portion of the picture.
9. Prepare the Water Bath
Place the cake pan inside a larger roasting pan.
Carefully pour hot water into the roasting pan.
The water should come approximately 1–2 inches up the outside of the cake pan.
This water bath creates a moist and gentle baking environment.
It helps prevent the outside of the cheesecake from becoming too dry or dark while the center cooks.
It also helps the cake maintain its soft, delicate texture.
10. Bake the Cheesecake
Preheat your oven to 320°F (160°C).
Place the water bath with the cake into the oven.
Bake for approximately 60–75 minutes, depending on your oven and the depth of your pan.
The top should become lightly golden.
After the initial baking period, reduce the oven temperature to approximately 300°F (150°C) and continue baking if the center still looks very loose.
The exact baking time can vary considerably between ovens.
Avoid opening the oven repeatedly because sudden temperature changes can cause an airy cheesecake to collapse.
11. Check for Doneness
The cake should look set around the edges while the center may still have a very gentle wobble.
You can insert a thin wooden skewer into the center. It should come out mostly clean with a little moisture.
The cake should not look completely dry.
Remember that the cake continues to set as it cools.
Overbaking can make the texture dry and cause the cake to lose some of its characteristic softness.
12. Cool the Cake Carefully
Once the cake is finished, turn off the oven.
Open the oven door slightly and allow the cake to remain inside for approximately 10–15 minutes.
This gradual cooling helps reduce the chance of a sudden collapse caused by a large temperature difference.
Remove the cake from the water bath.
Carefully remove the aluminum foil.
Allow the cake to cool in the pan.
As it cools, it may shrink slightly. A small amount of shrinkage is completely normal for this type of cake.
13. Remove the Cake From the Pan
Once the cake has cooled sufficiently, gently loosen the sides using a thin spatula or knife.
Place a plate over the pan and carefully turn the cake out.
Then turn it upright onto your serving plate.
Because this cake is very soft, handle it gently.
For the best presentation, wait until it has cooled completely before cutting.
14. Add Powdered Sugar
The cake in the picture has a beautiful light dusting of powdered sugar.
Place a small amount of powdered sugar into a fine sieve.
Hold it above the cooled cake and gently dust the surface.
You don’t need a thick layer. A light coating is enough to create the classic elegant appearance.
You can serve the cake plain or add fresh berries, strawberries, blueberries, or a small amount of whipped cream.
🍓 Serving Ideas
This cheesecake is delicious on its own, but there are many ways to serve it.
With Fresh Berries
Add strawberries, raspberries, blueberries, or blackberries around the cake.
The slightly tart fruit works beautifully with the creamy cake.
With Whipped Cream
Serve each slice with a small spoonful of lightly sweetened whipped cream.
With Fruit Sauce
A simple strawberry or raspberry sauce can be drizzled around the plate.
With Lemon
For a refreshing variation, add a little extra lemon zest over the powdered sugar.
With Chocolate
A small drizzle of melted chocolate can create a richer dessert.
💡 Important Tips for a Perfect Cotton Cheesecake
1. Use room-temperature ingredients
Cream cheese and eggs that are too cold can make the batter difficult to combine smoothly.
2. Don’t overbeat the egg whites
Very stiff egg whites can be harder to fold into the batter and may create a less even texture.
3. Fold gently
The air inside the meringue is what gives the cake its fluffy structure.
Use a spatula and fold from the bottom toward the top.
4. Don’t overbake
A cotton cheesecake should remain moist and tender.
If you bake it too long, the texture can become dry.
5. Use a water bath
The water bath provides gentle, humid heat and helps the cheesecake bake evenly.
6. Cool gradually
Avoid taking the cake directly from a very hot oven into a cold environment.
Gradual cooling helps minimize dramatic shrinking.
🧊 How to Store the Cake
Once completely cooled, place the cheesecake in an airtight container or cover it well with plastic wrap.
Store it in the refrigerator.
It is best enjoyed within several days.
Interestingly, the texture can become even more creamy and settled after several hours in the refrigerator.
If you prefer the cake softer, allow an individual slice to sit at room temperature for a short time before eating.
❄️ Can You Freeze It?
Yes, this type of cheesecake can be frozen.
Cut the completely cooled cake into individual slices.
Wrap each slice carefully and place the wrapped pieces in a freezer-safe container.
When you want to enjoy one, transfer it to the refrigerator and allow it to thaw gradually.
This makes it convenient to prepare the cake ahead of time.
🍰 Why This Cake Is So Fluffy
The unique texture comes primarily from the whipped egg whites.
Traditional cheesecake generally has a dense and rich texture because it contains a lot of cream cheese and little or no whipped air.
Japanese cotton cheesecake is different.
The whipped egg whites are folded into the cream cheese mixture, creating thousands of tiny air bubbles throughout the batter.
During baking, those air bubbles expand and help the cake rise.
The gentle water-bath baking method then helps the delicate structure cook without becoming overly dry.
The result is a cake that feels much lighter than a traditional cheesecake.
🔪 How to Cut Beautiful Slices
For clean slices, use a long, sharp knife.
Dip the knife briefly into warm water and wipe it dry before making each cut.
This helps the knife glide through the soft cake.
Cut with a gentle sawing motion rather than pressing straight down.
Clean the knife between slices for a neat presentation.
🍽️ Recipe Summary
Recipe: Japanese Cotton Cheesecake
Prep Time: 25–30 minutes
Bake Time: 60–75 minutes
Cooling Time: 30–60 minutes
Total Time: Approximately 2½ hours
Servings: 8–10 slices
Difficulty: Intermediate
Texture: Soft, airy, creamy, and delicate
❤️ Final Thoughts
This ultra-fluffy Japanese-style cotton cheesecake is a wonderful dessert when you want something elegant but not overly heavy. Its golden top, pale creamy center, and incredibly soft texture make it especially attractive for serving to family and guests.
The recipe does require a little patience, particularly when whipping and folding the egg whites, but those steps are what give the cake its signature lightness.
For the best result, take your time with the meringue, fold gently, bake slowly, and allow the cake to cool gradually.
Once finished, a simple dusting of powdered sugar is all you really need. The cake is beautiful enough to serve as it is, but fresh berries, whipped cream, or a little fruit sauce can make it even more special.
The first bite should be soft, airy, creamy, and lightly sweet, with just enough cream-cheese richness to remind you that you’re enjoying a cheesecake rather than an ordinary sponge cake.
It is an excellent dessert for birthdays, afternoon tea, family gatherings, holidays, or simply whenever you want to make something special at home. 🍰✨
Hashtags
#JapaneseCheesecake #CottonCheesecake #CheesecakeRecipe #FluffyCheesecake #EasyDessert #HomemadeDessert #BakingRecipe #CakeRecipe #SoftCake #CreamyCheesecake #DessertLovers #BakingAtHome #SweetTreat #DessertRecipe #HomemadeCake