Introduction
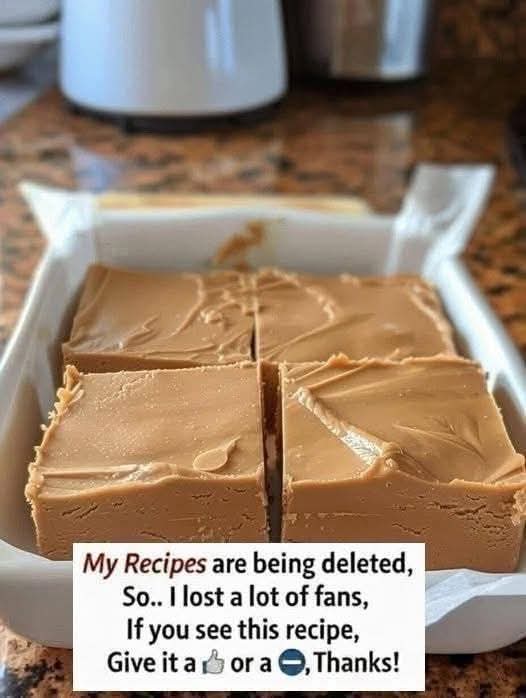
If you are craving something sweet, creamy, and full of delicious peanut butter flavor, this incredibly easy 2-ingredient peanut butter fudge is the perfect treat! 🤩 With just two simple ingredients and very little preparation, you can create a rich, melt-in-your-mouth dessert that tastes like something straight from an old-fashioned candy shop.
This homemade peanut butter fudge is perfect for busy days, holiday celebrations, family gatherings, bake sales, potlucks, or those moments when you simply want a little something sweet after dinner. There is no complicated candy-making process, no long list of ingredients, and no special equipment required.
The best part? You can prepare it ahead of time, let it chill until firm, and cut it into beautiful little squares whenever a craving strikes. Each bite delivers a wonderfully creamy texture and a satisfying peanut butter sweetness that peanut butter lovers will absolutely adore.
Whether you are making your first batch of homemade fudge or looking for a quick recipe to add to your family recipe collection, this simple two-ingredient version is an excellent place to start.
Ingredients
You only need 2 ingredients!
- 1 cup (approximately 250–270 g) creamy peanut butter: Choose a smooth, conventional peanut butter that is well mixed and not excessively oily for the most consistent texture.
- 1 can (approximately 14 oz or 396 g) sweetened condensed milk: This provides sweetness and creaminess and helps the fudge set when chilled.
Optional toppings: These are not part of the two-ingredient recipe, but you can add chopped peanuts, a small pinch of flaky salt, or a drizzle of melted chocolate if desired.
Instructions
Step 1: Prepare the Pan
Line an 8-inch square baking pan with parchment paper, leaving a little extra paper hanging over the sides. This will make it much easier to lift the finished fudge out of the pan.
Lightly grease the parchment paper if necessary to prevent sticking. Set the prepared pan aside while you make the fudge mixture.
Step 2: Melt the Peanut Butter
Place the peanut butter in a microwave-safe bowl. Warm it in short intervals of approximately 15–20 seconds, stirring between each interval, until it becomes soft and easy to mix.
Alternatively, place the peanut butter in a heatproof bowl over a saucepan of gently simmering water. Stir until smooth and warmed through.
Do not overheat the peanut butter. You want it soft and creamy, not extremely hot.
Step 3: Add the Sweetened Condensed Milk
Pour the sweetened condensed milk into the warm peanut butter. Stir slowly and thoroughly until both ingredients form a smooth, thick, glossy mixture.
Scrape the sides and bottom of the bowl with a spatula to make sure everything is evenly combined.
The mixture will become thick as you stir. This is normal and helps create that lovely dense fudge texture.
Step 4: Transfer to the Pan
Pour or spoon the peanut butter mixture into the prepared pan.
Use a spatula to spread it evenly into the corners. Smooth the surface so the finished squares will look neat and attractive.
If you like, sprinkle a few chopped peanuts or a tiny pinch of flaky salt over the top before chilling.
Step 5: Chill Until Firm
Place the pan in the refrigerator for approximately 3–4 hours, or until the fudge is completely firm enough to cut.
For a firmer texture, you can leave it in the refrigerator overnight.
Avoid cutting the fudge while it is still soft, as the squares may lose their shape.
Step 6: Slice and Serve
Once the fudge has set, lift it out of the pan using the parchment paper.
Place it on a cutting board and slice it into small squares with a sharp knife. For cleaner cuts, warm the knife slightly and wipe it dry between slices.
Arrange the pieces on a serving plate and enjoy your homemade peanut butter fudge!
Method of Preparation
Preparation time: 5–10 minutes
Chilling time: 3–4 hours
Cooking time: Only a few minutes to warm the ingredients
Total time: Approximately 3 hours and 15 minutes to 4 hours and 10 minutes
Yield: Approximately 25–36 small squares, depending on how you cut them
Difficulty: Very easy
This is a simple melt-and-mix fudge method. The peanut butter is warmed until smooth, then combined with sweetened condensed milk. The mixture is spread into a lined pan and chilled until firm.
Unlike traditional fudge recipes that often require boiling sugar to a specific temperature, this version is much more straightforward. It is an excellent option for beginners who want homemade candy without the stress of using a candy thermometer.
Remember that the exact firmness depends on the peanut butter brand, ingredient proportions, and chilling time. If your fudge seems too soft, refrigerate it longer before cutting.
The History of Peanut Butter Fudge
Fudge became a popular homemade confection in the United States during the late nineteenth century. Its appeal came from its rich sweetness, creamy texture, and the ability to make small, shareable pieces for friends and family.
Peanut butter later became a beloved ingredient in American home baking and candy-making. Its nutty flavor paired naturally with chocolate, sugar, and creamy confectionery mixtures.
Over time, home cooks developed easier fudge recipes using convenient ingredients such as condensed milk, chocolate chips, and peanut butter. These recipes helped make homemade fudge accessible to people who wanted delicious results without the complicated steps of traditional candy-making.
The two-ingredient peanut butter fudge recipe is a modern example of that practical home-cooking tradition. It celebrates the idea that a wonderful treat does not always require a long shopping list or hours in the kitchen.
Although this particular two-ingredient version is a simplified variation rather than a single historically established recipe, it carries on the same spirit of homemade sweetness, sharing, and family enjoyment.
Formation and Texture
The secret to this fudge is the combination of creamy peanut butter and sweetened condensed milk.
The peanut butter supplies the characteristic roasted peanut flavor, richness, and smooth consistency.
The sweetened condensed milk contributes concentrated sweetness and milk solids that help create a dense, creamy confection as the mixture cools.
When combined and chilled, the mixture becomes thicker and easier to slice. The result should be smooth, rich, and slightly firm while remaining creamy when eaten.
For the best formation, follow these simple tips:
- Use smooth peanut butter for an even texture.
- Stir the ingredients thoroughly so no streaks remain.
- Avoid adding extra liquid, which may prevent the fudge from setting properly.
- Spread the mixture evenly in the pan.
- Allow sufficient refrigeration time before slicing.
- Store the finished pieces in a covered container in the refrigerator.
Because peanut butter brands differ in their oil content, results may vary. If the mixture is unusually soft, additional chilling may help, but a recipe with different ingredient proportions may be needed for a consistently firm result.
Helpful Tips for Perfect Peanut Butter Fudge
1. Choose the Right Peanut Butter
Conventional creamy peanut butter generally gives the most reliable results. Natural peanut butter that separates easily may produce softer or oilier fudge, so stir it thoroughly before measuring if you choose to use it.
2. Warm Gently
Peanut butter only needs to soften. Excessive heat can make the mixture oily or difficult to handle.
3. Do Not Rush the Chilling Process
The refrigerator is essential for helping the fudge firm up. Give it enough time before attempting to cut it.
4. Make Clean, Beautiful Squares
Use a sharp knife and wipe it clean after each cut. Small squares are ideal because this fudge is quite rich.
5. Customize Your Batch
The original recipe needs only two ingredients, but you can add optional toppings if you want to make it special.
Try chopped roasted peanuts for crunch, a light sprinkle of sea salt to balance the sweetness, or a chocolate drizzle for a peanut-butter-cup-inspired dessert.
Delicious Variations
Chocolate Peanut Butter Fudge: Drizzle melted chocolate over the chilled fudge or swirl a little melted chocolate into the mixture before chilling.
Crunchy Peanut Butter Fudge: Replace some of the smooth peanut butter with crunchy peanut butter for extra texture. The final firmness may vary.
Salted Peanut Butter Fudge: Add a tiny sprinkle of flaky salt on top to contrast with the sweetness.
Peanut Butter and Chocolate Squares: Cut the finished fudge into small squares and serve alongside chocolate truffles or chocolate chip cookies on a dessert platter.
Holiday Peanut Butter Fudge: Place the squares in miniature paper candy cups and decorate with suitable festive sprinkles.
These additions are optional. For the easiest possible recipe, stick with the original two ingredients.
Serving Suggestions
This creamy peanut butter fudge is wonderful served with a cup of coffee, tea, or a glass of cold milk.
It also makes a lovely addition to:
- Holiday dessert trays.
- Birthday party sweet tables.
- Family movie-night snacks.
- Homemade gift boxes.
- Bake sales and potluck gatherings.
- Afternoon treats for visiting friends.
Because it is rich, small pieces are usually enough to satisfy a sweet craving. Arrange the squares in a single layer or separate layers with parchment paper to help keep them neat.
If giving the fudge as a gift, keep it chilled and let the recipient know that it contains peanuts and milk.
Storage Instructions
Refrigerator: Store the fudge in an airtight container in the refrigerator for approximately 1–2 weeks for best quality.
Freezer: For longer storage, freeze the squares in a freezer-safe container, separating the layers with parchment paper. They can generally be frozen for up to 2–3 months for best quality.
Thaw frozen pieces in the refrigerator before serving.
Because this recipe contains peanut butter and a dairy-based ingredient, do not leave it at room temperature for extended periods. Keep it refrigerated and follow the storage instructions on the condensed milk packaging.
Frequently Asked Questions
Can I make this fudge without a microwave?
Yes! Warm the peanut butter gently in a heatproof bowl over simmering water, then stir in the condensed milk.
Why is my peanut butter fudge too soft?
It may need more chilling time, or your peanut butter may contain more oil than the variety used when developing the recipe. Make sure you use the stated quantities and allow the fudge to become completely firm before cutting.
Can I use evaporated milk instead of condensed milk?
No, not as a direct substitute. Evaporated milk is unsweetened and has a different consistency, so the fudge may not set correctly.
Can I make the fudge ahead of time?
Absolutely! It is a convenient make-ahead dessert. Prepare it the day before your gathering and keep it covered in the refrigerator until serving.
Is this recipe suitable for peanut allergies?
No. Peanut butter is a major ingredient, so this recipe is not suitable for anyone with a peanut allergy. Do not substitute ingredients for an allergic person without checking that the alternatives are safe for them.
Conclusion
This easy two-ingredient peanut butter fudge proves that homemade desserts can be simple, delicious, and wonderfully satisfying. With creamy peanut butter, sweetened condensed milk, and a little patience while it chills, you can create a batch of rich, sweet squares without complicated candy-making techniques.
It is the kind of recipe you can prepare for a special occasion, share with friends, bring to a family gathering, or keep in the refrigerator for a little homemade treat whenever you want something sweet.
Once you try it, you may find yourself making it again and again. Keep the two ingredients on hand, prepare a batch whenever a craving strikes, and enjoy the simple pleasure of homemade peanut butter goodness!
For Peanut Butter Fudge Lovers ❤️
If you love creamy peanut butter, easy homemade sweets, and recipes that do not require a dozen ingredients, this fudge deserves a place in your recipe collection.
Share a plate with your family, wrap a few squares for a friend, or save some for a quiet afternoon treat. The beauty of this recipe is its simplicity: two ingredients, a few minutes of preparation, and a delicious dessert waiting in the refrigerator.
A little peanut butter, a little sweetness, and a whole lot of happiness in every bite! 🥜❤️
Final Method Recap
- Line an 8-inch square pan with parchment paper.
- Gently warm 1 cup of creamy peanut butter.
- Stir in 1 can of sweetened condensed milk until smooth.
- Spread the mixture evenly in the prepared pan.
- Refrigerate for 3–4 hours or until firm.
- Lift out, cut into squares, and serve chilled.
Enjoy your homemade 2-ingredient peanut butter fudge!