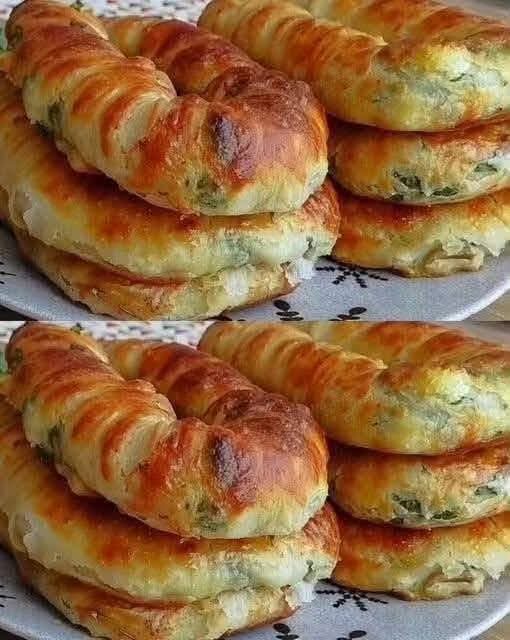
These beautiful golden pastries are perfect for breakfast, brunch, lunch, or a satisfying snack. They have a soft, flavorful filling inside and a beautifully browned, crispy pastry outside. The filling can be customized with chicken, cheese, vegetables, herbs, or a combination of your favorite ingredients.
Introduction
Homemade stuffed pastries are one of those recipes that look impressive but can actually be made quite easily. The key is preparing a flavorful filling, keeping the pastry moist enough to fold without breaking, and baking it until the outside becomes deeply golden.
For this version, we will make a creamy chicken-and-cheese filling with herbs and vegetables. The filling is rich and savory, while the pastry becomes crisp and golden in the oven. These pastries are especially delicious when served warm, when the cheese is still soft and melted.
They are also convenient for meal preparation. You can prepare the filling in advance, assemble the pastries later, and bake them shortly before serving.
Ingredients
For the filling
- 2 cups cooked chicken, shredded or finely chopped
- 1 medium onion, finely chopped
- 1 small bell pepper, finely diced
- 2 cloves garlic, minced
- 1 tablespoon olive oil
- 1 tablespoon butter
- ½ teaspoon salt
- ½ teaspoon black pepper
- ½ teaspoon paprika
- ½ teaspoon dried oregano
- ½ teaspoon dried parsley
- ¼ teaspoon garlic powder
- ½ cup cream cheese
- 1 cup shredded mozzarella cheese
- ½ cup shredded cheddar cheese
- 2 tablespoons fresh parsley, chopped
- 2 tablespoons milk, if needed
For the pastry
- 10–12 sheets of pastry dough, puff pastry, or thin flatbread-style pastry
- 3 tablespoons melted butter
- 2 tablespoons olive oil
For the topping
- 1 egg
- 1 tablespoon milk
- 2 tablespoons shredded cheese
- 1 tablespoon chopped parsley
- Sesame seeds, optional
Equipment
You will need:
- Large frying pan
- Mixing bowl
- Wooden spoon
- Baking tray
- Baking paper
- Pastry brush
- Sharp knife
- Small bowl for the egg wash
Preparing the Filling
Start by heating a large frying pan over medium heat.
Add the olive oil and butter. Once the butter has melted, add the chopped onion.
Cook the onion for approximately 4–5 minutes. You do not want it to become dark brown; instead, cook it until soft and slightly golden.
Add the chopped bell pepper and continue cooking for another 3–4 minutes.
Add the minced garlic and cook for approximately 30 seconds. Garlic cooks quickly, so avoid burning it.
Now add the shredded chicken.
Season with salt, black pepper, paprika, oregano, parsley, and garlic powder. Stir everything together so the spices are evenly distributed throughout the chicken.
Cook the mixture for another 3–5 minutes.
Turn the heat to low and add the cream cheese.
Stir gently until the cream cheese melts into the chicken mixture.
Add the mozzarella and cheddar.
Continue stirring until the cheese begins to melt and everything becomes creamy.
If the mixture looks too thick, add 1–2 tablespoons of milk. You want the filling to be creamy but not watery.
Finally, add the fresh parsley.
Taste the filling and adjust the seasoning if necessary.
Remove the pan from the heat and allow the filling to cool for several minutes.
Important: Do not put extremely hot filling onto the pastry. Letting it cool slightly makes the pastry much easier to handle and reduces the chance of it becoming soggy.
Preparing the Pastry
Place your pastry sheets on a clean work surface.
If using puff pastry, allow it to thaw according to the package instructions while keeping it cool.
If using thin pastry sheets, cover the unused sheets with a clean, slightly damp kitchen towel so they do not dry out.
Mix the melted butter and olive oil together.
Using a pastry brush, lightly brush one pastry sheet with the butter-and-oil mixture.
Place another sheet on top and brush it lightly again.
Depending on the pastry you’re using, two layers are usually enough. If your pastry is particularly thin, you can use three layers.
Filling the Pastries
Place approximately 2–3 tablespoons of filling near one end of the pastry.
Do not overfill.
If you add too much filling, the pastry may burst during baking.
Fold the sides inward and then roll the pastry into a neat rectangle or cylinder.
Press the edges gently to seal them.
Repeat with the remaining pastry and filling.
Place each finished pastry onto a baking tray lined with parchment paper.
Leave a little space between them so the hot air can circulate around each pastry.
Making the Egg Wash
Crack one egg into a small bowl.
Add one tablespoon of milk.
Whisk together until smooth.
Using a pastry brush, lightly coat the surface of every pastry with the egg wash.
This is what gives the pastries that beautiful golden-brown appearance.
Sprinkle a little shredded cheese, parsley, or sesame seeds over the top if desired.
Baking Method
Preheat your oven to 190°C / 375°F.
Place the tray in the center of the oven.
Bake for approximately 20–30 minutes, depending on the type and thickness of pastry you use.
The pastries are ready when:
- The surface is golden brown.
- The edges are crisp.
- The pastry feels firm.
- The cheese has melted.
- The filling is hot.
For an especially crispy top, you can increase the oven temperature slightly during the final few minutes, but watch carefully so the pastries do not burn.
Once baked, remove the tray from the oven.
Allow the pastries to rest for about 5 minutes before serving.
How to Make Them Extra Crispy
The photograph shows pastries with a beautifully browned exterior. To achieve a similar result, there are several useful tricks.
First, avoid making the filling watery. Excess moisture is one of the biggest causes of soggy pastry.
Second, do not overload the pastries.
Third, make sure the oven is completely preheated before putting the tray inside.
Fourth, leave enough space between the pastries.
Finally, brushing the outside lightly with butter or egg wash helps create a beautiful golden crust.
Alternative Fillings
The great thing about this recipe is that the filling can easily be changed.
Chicken and spinach
Replace the bell pepper with chopped spinach. Cook the spinach until the excess moisture has evaporated, then combine it with the chicken and cheese.
Beef filling
Use cooked minced beef instead of chicken. Add onion, garlic, paprika, black pepper, parsley, and a little cumin.
Cheese and vegetables
For a vegetarian version, use mozzarella, cheddar, cream cheese, bell pepper, spinach, mushrooms, and onions.
Potato and cheese
Boil potatoes until tender, mash them, and combine them with cheese, parsley, black pepper, and paprika.
Tuna filling
Combine drained tuna with cream cheese, mozzarella, sweetcorn, chopped parsley, and a small amount of black pepper.
Serving Suggestions
These pastries are delicious on their own, but you can serve them with several simple accompaniments.
A fresh green salad provides a light contrast to the rich filling.
You can also serve them with:
- Garlic yogurt sauce
- Tomato sauce
- Cucumber salad
- Green salad
- Fresh vegetables
- Roasted potatoes
- Coleslaw
- A simple yogurt-and-herb dip
For a dipping sauce, mix:
- ½ cup plain yogurt
- 1 tablespoon mayonnaise
- 1 small minced garlic clove
- 1 teaspoon lemon juice
- A pinch of salt
- Chopped parsley
Stir everything together and refrigerate for 15–20 minutes before serving.
Storage
Allow leftover pastries to cool completely before storing them.
Place them in an airtight container and refrigerate.
They can generally be kept refrigerated for a few days when handled properly.
To reheat them, an oven or air fryer works better than a microwave because it helps restore the crispy exterior.
For the oven, place them on a baking tray and heat at approximately 180°C / 350°F until warmed through.
An air fryer can also make them wonderfully crisp again.
Freezing Instructions
These pastries are also suitable for freezing before baking.
Prepare and assemble the pastries as described above, but do not apply the egg wash yet.
Place them on a tray and freeze until firm.
Then transfer them into a freezer-safe container or bag.
When you want to bake them, place them on a baking tray, apply the egg wash, and bake until completely golden and cooked through. Frozen pastries may require additional baking time.
This makes them especially convenient for busy days.
Tips for Perfect Results
1. Don’t overfill
A smaller amount of filling is easier to seal and produces a neater pastry.
2. Cool the filling
Warm filling is fine, but very hot filling can soften the pastry too much.
3. Seal the edges
Press the edges firmly so the cheese does not escape during baking.
4. Use enough egg wash
A thin, even layer gives the pastries their attractive golden finish.
5. Watch the final minutes
Cheese and pastry can go from golden to overly dark quickly.
6. Let them rest
Allowing them to rest for a few minutes after baking helps the filling settle and makes them easier to eat.
History and Inspiration
Stuffed pastries have appeared in many cuisines around the world for centuries. Different cultures have developed their own versions using local doughs, spices, vegetables, meats, and cheeses.
The basic idea is simple: place a flavorful filling inside dough, seal it, and cook it until the exterior becomes golden and delicious.
This makes stuffed pastries incredibly adaptable. They can be served as street food, family meals, party appetizers, lunchbox snacks, or festive dishes.
The version shown in the image has the appearance of a modern homemade savory pastry: golden on the outside, filled generously, and finished with herbs. The exact original recipe cannot be determined from the photograph alone, so the recipe above is a practical interpretation designed to produce a similar result.
Conclusion
These Golden Stuffed Chicken and Cheese Pastries are a wonderful combination of crispy pastry, creamy cheese, seasoned chicken, vegetables, and fresh herbs.
They are easy enough for an ordinary family meal but attractive enough for guests and celebrations. The filling can also be changed depending on what you have available in your kitchen.
The most important things to remember are to avoid a watery filling, don’t overfill the pastry, seal the edges carefully, and bake until the outside is beautifully golden.
Serve them warm with a fresh salad and a creamy garlic dip, and you have a comforting meal that is both satisfying and easy to customize. 🥐🧀✨