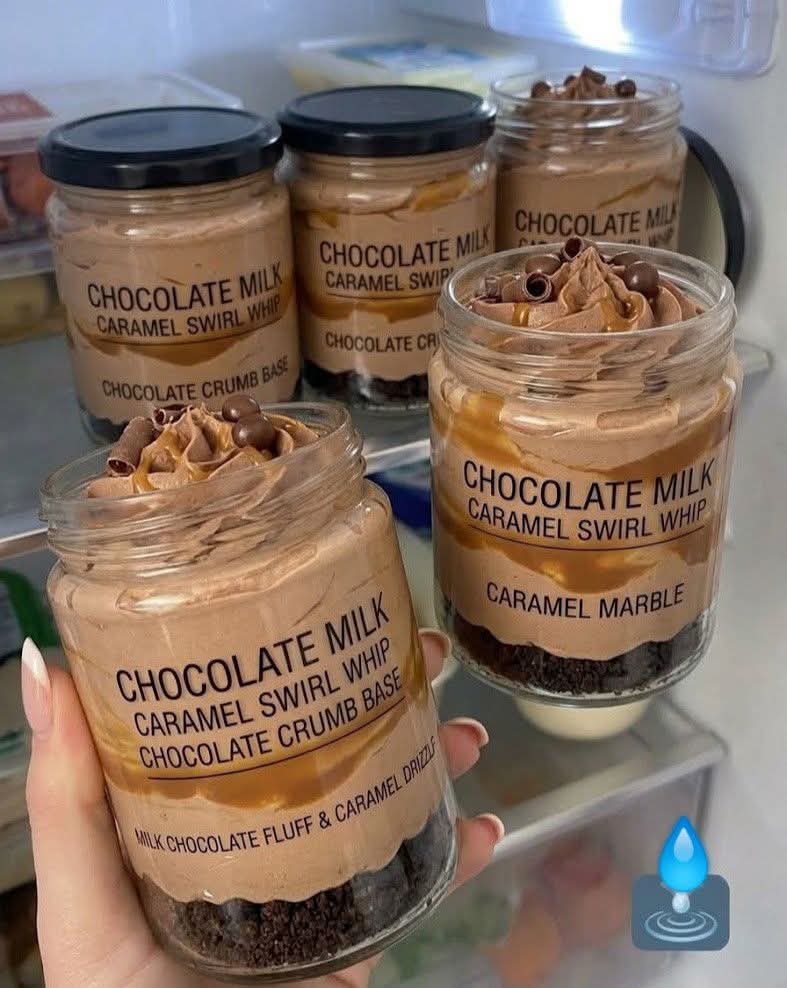
The dessert in your photo looks like individual chocolate-and-caramel dessert cups made with a chocolate cookie crumb base, creamy chocolate mousse or pudding, caramel swirl, and chocolate decorations. Here is a 1000+ word recipe inspired by the image.
Introduction
These Chocolate Milk Caramel Swirl Dessert Cups are rich, creamy, and perfect for individual servings. Each jar contains several delicious layers: a crunchy chocolate cookie base, smooth chocolate cream, ribbons of caramel, and a light chocolate topping decorated with chocolate curls and small chocolate pieces.
The combination of chocolate and caramel is especially delicious because the deep cocoa flavor balances the sweetness of the caramel. The cookie crumbs provide a crunchy contrast to the soft cream, while chilling the dessert allows all the layers to come together.
Individual dessert jars are also convenient for parties and gatherings because every person receives their own portion. They can be prepared ahead of time and stored in the refrigerator until you’re ready to serve them.
The exact ingredients used in the photographed dessert cannot be determined from the image alone, so this recipe is a homemade version designed to create a similar appearance and texture.
Recipe Information
Recipe: Chocolate Milk Caramel Swirl Dessert Cups
Preparation: 30 minutes
Chilling: 2–4 hours
Servings: 6–8 dessert cups
Difficulty: Easy to moderate
Texture: Creamy, fluffy, crunchy
Flavor: Chocolate, caramel, and vanilla
Ingredients
Chocolate Crumb Base
- 250 g chocolate sandwich cookies or chocolate biscuits
- 60 g melted butter
- 1 tablespoon unsweetened cocoa powder, optional
Chocolate Cream
- 250 g cream cheese, softened
- ½ cup powdered sugar
- 1 teaspoon vanilla extract
- 200 g melted milk or semi-sweet chocolate
- 1 cup cold heavy whipping cream
- 2 tablespoons cocoa powder
- ¼ cup milk, if needed
Caramel Swirl
- ¾ cup caramel sauce
- 2 tablespoons heavy cream
- ½ teaspoon vanilla extract
- A small pinch of salt, optional
Chocolate Topping
- ½ cup cold heavy whipping cream
- 2 tablespoons powdered sugar
- 1 tablespoon cocoa powder
- ½ teaspoon vanilla extract
Decoration
- Chocolate curls
- Small chocolate pieces
- Chocolate chips
- Caramel drizzle
- Crushed chocolate cookies
Equipment
You will need:
- 6–8 small dessert jars or clear cups
- Food processor or rolling pin
- Mixing bowls
- Electric hand mixer
- Spatula
- Measuring cups and spoons
- Small saucepan or microwave-safe bowl
- Piping bag, optional
- Refrigerator
Clear jars are recommended because they allow the beautiful layers to remain visible.
Step 1: Make the Chocolate Cookie Base
Begin by crushing the chocolate cookies.
Place them in a food processor and pulse until you have fine crumbs.
If you don’t have a food processor, place the cookies inside a sealed food bag and crush them with a rolling pin.
You want the crumbs to be relatively fine, but a few tiny pieces can remain for additional texture.
Place the crumbs in a bowl.
Add the melted butter.
Mix thoroughly until the crumbs resemble wet sand.
If you want a stronger chocolate flavor, add one tablespoon of cocoa powder and mix again.
The butter helps the crumbs stick together and creates a richer base.
Step 2: Fill the Jars
Place approximately 2–3 tablespoons of the chocolate cookie mixture into the bottom of each jar.
Press the crumbs gently with the back of a spoon.
Don’t compact them too aggressively because you still want a pleasant crumbly texture.
Try to make the layer approximately the same thickness in every jar.
Place the jars in the refrigerator while preparing the chocolate filling.
Step 3: Prepare the Chocolate
Melt the chocolate carefully.
You can use a microwave or a double-boiler method.
Microwave method
Place the chocolate in a microwave-safe bowl.
Heat for approximately 15–20 seconds at a time.
Stir after each interval.
Continue until the chocolate is almost completely melted.
Stir until smooth.
Allow the chocolate to cool slightly.
It should remain liquid but should not be extremely hot.
Step 4: Prepare the Cream Cheese Mixture
Place the softened cream cheese in a large mixing bowl.
Add the powdered sugar.
Beat until smooth and creamy.
Add the vanilla extract.
Mix again.
Add the cocoa powder.
Continue mixing until the mixture has an even chocolate color.
Make sure there are no large lumps of cream cheese.
Step 5: Add the Melted Chocolate
Slowly add the melted chocolate to the cream cheese mixture.
Mix gently until completely incorporated.
The mixture should become smooth, rich, and chocolatey.
If it seems excessively thick, add a small amount of milk.
Do not add too much milk because you want the finished dessert to remain thick enough to hold its shape.
Step 6: Whip the Cream
Pour the cold heavy whipping cream into another bowl.
Using an electric mixer, beat the cream until it begins to thicken.
Add the powdered sugar.
Continue whipping until soft-to-medium peaks form.
Don’t overbeat the cream.
The goal is to create a light, fluffy texture.
Step 7: Combine the Chocolate and Whipped Cream
Add approximately one-third of the whipped cream to the chocolate mixture.
Fold gently with a spatula.
Once incorporated, add another portion.
Continue folding.
Finally, add the remaining whipped cream.
Fold gently until the mixture is smooth and fluffy.
Avoid vigorous stirring because that can remove the air from the whipped cream.
You should now have a creamy chocolate mousse-like filling.
Step 8: Prepare the Caramel
Place the caramel sauce in a small bowl.
Add the heavy cream.
Mix until smooth.
Add vanilla if desired.
For a slightly more balanced flavor, add a tiny pinch of salt.
If the caramel is too thick to drizzle, warm it very gently.
Allow it to cool before adding it to the dessert.
The caramel should be pourable but not hot.
Step 9: Build the Dessert Layers
Remove the jars containing the chocolate cookie base from the refrigerator.
Add a layer of chocolate cream.
You can spoon it into the jars or use a piping bag for a cleaner appearance.
Add a small drizzle of caramel.
Don’t add too much because the caramel is sweet.
Add another layer of chocolate cream.
Then add another thin caramel swirl.
Continue until the jars are almost full.
The exact number of layers depends on the size of your jars.
Creating the Caramel Swirl
For the appearance shown in the picture, don’t completely mix the caramel into the chocolate cream.
Instead, drizzle caramel down the inside of the jar before adding the chocolate cream.
You can also drizzle a little caramel across the surface.
Then use a toothpick to make a gentle swirl.
This creates attractive caramel ribbons throughout the chocolate layer.
Step 10: Prepare the Chocolate Topping
Pour cold heavy cream into a mixing bowl.
Add powdered sugar, cocoa powder, and vanilla.
Whip until thick enough to hold its shape.
Transfer the chocolate whipped cream into a piping bag.
Pipe a small swirl on top of each dessert cup.
You can create a simple rosette, spiral, or decorative peak.
Step 11: Decorate
Now comes the fun part.
Add chocolate curls to the top.
You can also add:
- Chocolate chips
- Mini chocolate pieces
- Crushed cookies
- Caramel drizzle
- Chocolate shavings
- Small caramel candies
For a look similar to the photograph, add a few chocolate curls and small chocolate pieces to the top.
Finally, drizzle a little caramel over the chocolate cream.
Step 12: Chill
Place the completed dessert cups in the refrigerator.
Chill for at least 2 hours.
For the best texture, you can refrigerate them for approximately 4 hours.
Chilling allows the cookie base to firm up and gives the chocolate cream time to become thicker.
The caramel also settles into the layers.
Serving
Remove the dessert cups from the refrigerator shortly before serving.
Serve them cold.
Because they are already individually portioned, you don’t need to slice or plate anything.
These dessert cups are particularly attractive when served in clear glass jars because guests can see all the layers.
Variations
Chocolate Peanut Butter
Add a thin layer of peanut butter between the chocolate layers.
You can also add chopped peanuts to the cookie base.
Chocolate Hazelnut
Add a spoonful of hazelnut chocolate spread to the chocolate cream.
Top with chopped toasted hazelnuts.
Salted Caramel
Use salted caramel sauce or add a tiny pinch of flaky salt to the caramel.
White Chocolate
Replace part of the milk chocolate with melted white chocolate.
This creates a sweeter and lighter variation.
Mocha
Add a small amount of instant espresso powder to the chocolate cream.
The coffee flavor intensifies the chocolate.
Oreo-Style
Use chocolate sandwich cookies for the base and sprinkle additional crushed cookies between the layers.
Tips for Perfect Dessert Cups
Use room-temperature cream cheese
Softened cream cheese blends much more smoothly.
Keep the whipping cream cold
Cold cream whips more effectively.
Don’t overmix
Fold the whipped cream gently into the chocolate mixture.
Cool the melted chocolate
Hot chocolate can cause the whipped cream mixture to lose its texture.
Don’t overfill the jars
Leave enough room for the decorative topping.
Use clear containers
They make the layers much more attractive.
Chill properly
The dessert needs time to set.
Don’t make the caramel too hot
Warm caramel can soften the chocolate cream.
Make-Ahead Instructions
These desserts are excellent for preparing in advance.
You can assemble them several hours before serving.
Cover each jar with a lid or plastic wrap.
Keep them refrigerated.
Add delicate chocolate decorations shortly before serving if you want them to remain crisp and attractive.
Storage
Keep the finished dessert cups refrigerated.
For best texture and freshness, consume them within approximately 2–3 days.
Keep them covered to prevent the dessert from absorbing odors from other foods in the refrigerator.
Do not leave cream-based desserts at room temperature for extended periods.
History and Background
Layered desserts served in individual cups have become popular because they combine attractive presentation with convenient serving.
The basic idea of combining cookie crumbs, creamy filling, chocolate, and caramel is related to many modern no-bake dessert styles.
Chocolate and caramel have long been paired in cakes, candies, puddings, ice cream, and other desserts because their flavors complement each other.
The addition of a crumb base provides a contrast between crunchy and creamy textures.
Individual jars make the dessert particularly convenient for parties and celebrations because each serving can be assembled separately.
The exact dessert shown in the photograph appears to be a modern chocolate-caramel layered dessert, but the specific recipe and its origin cannot be confirmed from the image alone.
Conclusion
These Chocolate Milk Caramel Swirl Dessert Cups are a rich and impressive homemade dessert that combines everything you want in a layered sweet treat: crunchy chocolate crumbs, smooth chocolate cream, silky caramel, fluffy topping, and chocolate decorations.
The recipe is simple enough to prepare at home while still looking elegant when served in clear jars.
For the closest appearance to your picture, use a generous chocolate cookie base, create visible caramel swirls throughout the chocolate cream, finish with a chocolate whipped topping, and decorate with chocolate curls and small chocolate pieces.
Chill the finished cups thoroughly before serving so the layers become firm and the flavors have time to blend.
Enjoy your rich homemade Chocolate Caramel Dessert Cups! 🍫🍯🥄