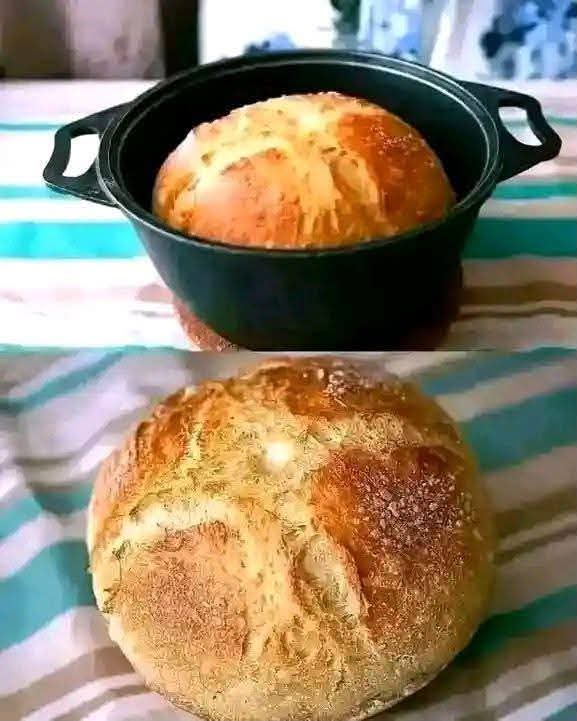
🍞 Homemade Dutch Oven Garlic & Herb Bread
🌟 Introduction
This beautiful rustic homemade bread is baked in a covered Dutch oven, which helps create a wonderfully crisp, golden crust while keeping the inside soft, airy, and chewy. The bread shown has a simple homemade appearance with a beautifully browned top and a deliciously rustic texture.
It is perfect for breakfast, sandwiches, soups, dinner, or simply sliced warm with butter. 🧈🍞
—
🛒 Ingredients
For the dough
3 cups (375 g) all-purpose flour
1½ cups (360 ml) warm water
2 teaspoons instant yeast
1½ teaspoons salt
1 teaspoon sugar or honey
1 tablespoon olive oil
For the flavor
2 cloves garlic, finely minced
1 teaspoon dried rosemary
1 teaspoon dried thyme
½ teaspoon dried oregano
½ teaspoon black pepper
1 tablespoon chopped fresh parsley, optional
For the top
1 tablespoon olive oil
A little rosemary or thyme
A pinch of coarse salt
—
👩🍳 Instructions
1. Activate the yeast
In a large bowl, combine the warm water, sugar and yeast.
Stir gently and let it stand for 5–10 minutes until slightly foamy.
> The water should be warm, not hot, because very hot water can damage the yeast.
2. Prepare the dough
Add the flour and salt to the bowl.
Pour in the olive oil and add the garlic, rosemary, thyme, oregano and black pepper.
Mix with a wooden spoon until a rough, sticky dough forms.
Don’t worry if the dough looks wetter than ordinary bread dough—that’s normal for this rustic style.
3. Rest and develop the dough
Cover the bowl with plastic wrap or a clean kitchen towel.
Leave it in a warm place for approximately 1½–2 hours, or until the dough has roughly doubled in size.
For deeper flavor, you can refrigerate the covered dough overnight and bake it the next day.
—
🥖 Shaping the Bread
Lightly flour your work surface.
Gently transfer the dough onto it.
Fold the dough inward from several sides, forming a loose round loaf.
Try not to press all the air out of the dough. Those air pockets help give the finished bread its beautiful texture.
Place the shaped dough on parchment paper and let it rest for another 30–45 minutes.
—
🔥 Dutch Oven Baking Method
Step 1 — Preheat
Place your Dutch oven, including its lid, inside the oven.
Preheat to 230°C (450°F) for approximately 30 minutes.
The hot Dutch oven is an important part of getting that crisp crust.
Step 2 — Prepare the loaf
Carefully place the dough, still on parchment paper, into the hot Dutch oven.
Brush the top lightly with olive oil.
Sprinkle with rosemary, thyme and a little coarse salt.
Using a sharp knife, make one or two shallow cuts across the top of the dough.
Step 3 — Covered baking
Put the lid on the Dutch oven.
Bake for approximately 25–30 minutes.
The trapped steam helps the bread expand and develops that characteristic crust.
Step 4 — Uncovered baking
Remove the lid carefully.
Continue baking for another 15–20 minutes, until the bread is deeply golden brown and sounds hollow when tapped underneath.
Step 5 — Cool
Remove the bread from the Dutch oven and place it on a cooling rack.
Allow it to cool for at least 30 minutes before slicing.
This allows the interior to finish setting.
—
🌿 Flavor Formation
The flavor comes from several simple ingredients working together:
Garlic + rosemary + thyme + olive oil + slow fermentation = aromatic rustic bread.
The Dutch oven creates a humid environment during the first stage of baking. This helps the dough expand before the final uncovered stage dries and crisps the crust.
—
📖 A Little History
Rustic hearth breads have been made for centuries using basic ingredients such as flour, water, salt and yeast or naturally occurring fermentation.
Dutch ovens became especially useful for home bread baking because their heavy construction retains heat extremely well. When the pot is covered, steam from the dough remains trapped inside, helping produce a crust similar to bread baked in a professional oven.
The modern no-knead Dutch oven bread became particularly popular because it allows home cooks to make artisan-style bread with very little equipment or complicated kneading.
—
🧈 Serving Ideas
This bread is delicious served with:
🧈 Salted butter
🫒 Olive oil and herbs
🧄 Garlic butter
🍅 Tomato soup
🥣 Vegetable soup
🧀 Cheese
🥚 Fried or scrambled eggs
🥗 Fresh salad
🍗 Roasted chicken
You can also slice it, toast it and use it for sandwiches.
—
❤️ For Bread Lovers
If you love a crispy crust with a soft, fluffy center, this is a recipe worth saving.
For extra garlic flavor, mix roasted garlic into the dough. For a cheesy version, add ½–1 cup shredded Parmesan or mozzarella during mixing.
You can also replace the herbs with:
Basil 🌿
Sage
Italian seasoning
Chili flakes 🌶️
Black pepper and Parmesan 🧀
—
⭐ Chef’s Tips
1. Don’t use very hot water when mixing the yeast.
2. A sticky dough is normal—avoid adding too much flour.
3. Give the dough enough time to rise.
4. Preheat the Dutch oven properly.
5. Be extremely careful when handling the hot pot and lid.
6. Don’t slice the bread immediately after baking; let it cool first.
7. For an extra-crispy crust, make sure the final baking stage is uncovered.
—
🥰 Conclusion
This Homemade Dutch Oven Garlic & Herb Bread is simple, rustic and incredibly satisfying. With a golden crunchy crust, soft interior and fragrant garlic-herb flavor, it makes an excellent addition to almost any meal.
Homemade bread, straight from the oven, is hard to beat! 🍞🧄🌿❤️