Easy No-Knead Herb Bread
Introduction
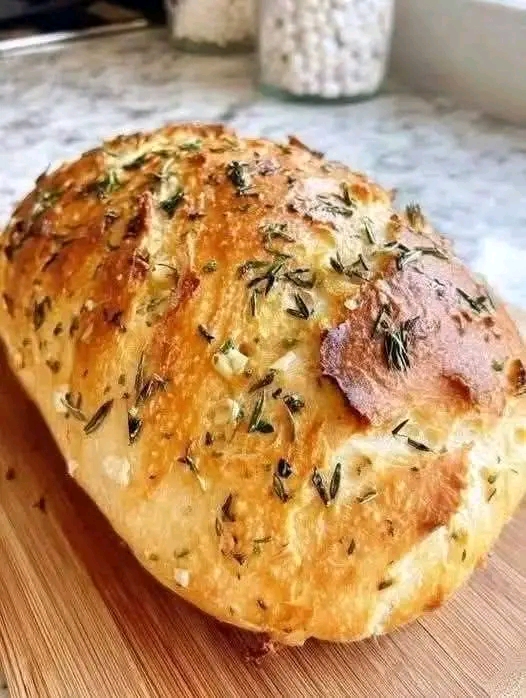
If you’re looking for a homemade bread recipe that is simple, affordable, and delicious, this No-Knead Herb Bread is perfect. There is no need for eggs, butter, or complicated techniques. With just a few basic pantry ingredients, you can create a beautiful loaf with a crispy golden crust and a soft, fluffy interior. The herbs baked into the crust add wonderful aroma and flavor, making this bread ideal for breakfast, sandwiches, soups, or serving alongside dinner.
History of No-Knead Bread
No-knead bread became popular because it allows anyone to bake artisan-style bread at home without intensive kneading. Traditional bread-making often required long kneading sessions to develop gluten. Modern no-knead methods rely on time and fermentation instead, creating excellent texture with minimal effort. Today, no-knead bread is loved worldwide for its simplicity and rustic appearance.
Ingredients
For the Dough
- 3 cups (375 g) all-purpose flour
- 1½ teaspoons salt
- 1 teaspoon sugar
- 1 teaspoon instant yeast
- 1¼ cups (300 ml) warm water
For the Herb Topping
- 1 tablespoon dried rosemary
- 1 tablespoon dried thyme
- 1 tablespoon olive oil
- 1 teaspoon coarse salt (optional)
Equipment
- Large mixing bowl
- Wooden spoon
- Loaf pan or baking sheet
- Kitchen towel
- Oven
Preparation Method
Step 1: Mix the Dough
- In a large bowl, combine flour, salt, sugar, and yeast.
- Pour in the warm water.
- Stir with a spoon until a sticky dough forms.
Step 2: First Rise
- Cover the bowl with a towel.
- Let the dough rise for 1½–2 hours until doubled in size.
Step 3: Shape the Bread
- Lightly flour your hands.
- Transfer the dough onto a floured surface.
- Shape into a loaf without kneading.
Step 4: Add Herbs
- Place the loaf in a greased loaf pan or on a baking sheet.
- Brush lightly with olive oil.
- Sprinkle rosemary, thyme, and coarse salt over the top.
Step 5: Second Rise
- Cover loosely.
- Allow to rise for another 30 minutes.
Step 6: Bake
- Preheat oven to 220°C (425°F).
- Bake for 30–35 minutes until golden brown.
- The loaf should sound hollow when tapped.
Step 7: Cool
- Remove from oven.
- Cool on a wire rack for at least 20 minutes before slicing.
Formation and Texture
This bread develops:
- A crisp golden crust
- A soft and airy crumb
- Rustic artisan appearance
- Fragrant herb-infused flavor
- Excellent structure without kneading
Serving Suggestions
Enjoy this bread with:
- Butter or olive oil
- Soups and stews
- Cheese boards
- Sandwiches
- Breakfast spreads
- Roasted vegetables
- Pasta dishes
Why Bread Lovers Adore This Recipe
Easy Bread Lovers
People who are new to baking love this recipe because:
- No kneading required
- Few ingredients
- Budget-friendly
- Reliable results
Artisan Bread Lovers
Experienced bakers enjoy:
- Crispy crust
- Rustic appearance
- Long fermentation flavor
- Homemade freshness
Family Bread Lovers
Families appreciate:
- Soft texture
- Versatile uses
- Delicious aroma
- Perfect for sharing
Tips for Success
- Use warm, not hot, water.
- Allow enough rising time.
- Do not over-handle the dough.
- Bake until deeply golden.
- Let the bread cool before slicing.
Variations
- Add minced garlic for garlic herb bread.
- Mix in grated cheese.
- Add olives for Mediterranean flavor.
- Include sunflower or sesame seeds.
- Replace rosemary with oregano or basil.
Nutritional Benefits
- Provides carbohydrates for energy.
- Low in fat.
- Contains minerals from herbs.
- No eggs or butter required.
- Simple and wholesome ingredients.
Conclusion
This Easy No-Knead Herb Bread proves that making fresh homemade bread doesn’t have to be difficult or expensive. With no kneading, no eggs, and no butter, it delivers a beautifully crusty loaf packed with flavor and aroma. Whether you’re a beginner baker or a bread enthusiast, this recipe is an excellent way to enjoy fresh bread straight from your own oven. Every slice offers a perfect balance of simplicity, comfort, and homemade goodness. 🍞✨