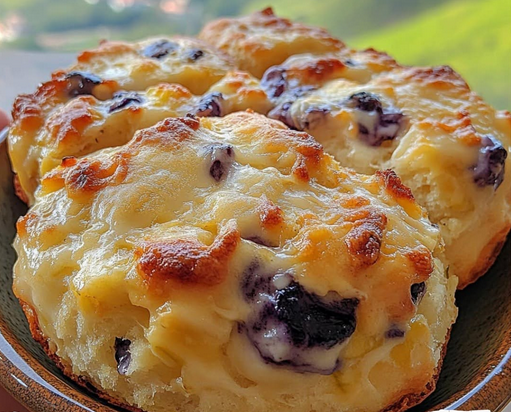
There’s something universally comforting about a warm, buttery biscuit straight from the oven. But add sweet, juicy blueberries and a light vanilla-lemon glaze, and you’ve transformed a humble biscuit into a delightful indulgence that straddles the line between breakfast and dessert. These Sweet Blueberry Biscuits are soft, flaky, slightly sweet, and bursting with fruity goodness. Whether you enjoy them with a cup of coffee in the morning or as a mid-day treat, this recipe is sure to become a favorite in your kitchen.
Below, you’ll find a detailed breakdown of the ingredients, step-by-step instructions, and tips to ensure biscuit perfection every time.
Ingredients
For the Biscuits:
- 2 cups all-purpose flour
- 1 cup cold milk
- ⅓ cup granulated sugar
- 5 tablespoons cold or frozen butter
- 4 teaspoons baking powder
- 1 teaspoon salt
- 3 ounces blueberries (fresh or dried – see notes below)
For the Glaze:
- 1 cup powdered sugar
- ⅛ cup water
- 1 teaspoon vanilla extract
- ½ teaspoon lemon juice
- 1 tablespoon butter (melted, for brushing the warm biscuits)
Instructions: Step-by-Step Guide
1. Preheat the Oven
Begin by preheating your oven to 450°F (232°C). A hot oven is essential for achieving that initial rise that makes biscuits fluffy and tender.
2. Mix Dry Ingredients
In a large mixing bowl, whisk together:
- 2 cups of flour
- 1 teaspoon salt
- ⅓ cup sugar
- 4 teaspoons of baking powder
This dry mixture is the structural base of your biscuits. The sugar adds a mild sweetness that pairs beautifully with the tartness of the blueberries and the richness of the glaze.
3. Add Milk and Blueberries
Pour 1 cup of cold milk into the dry ingredients, and gently fold in your 3 ounces of blueberries.
💡 Tip: If using fresh blueberries, rinse and dry them thoroughly. If using dried blueberries, you can soak them in warm water for 10 minutes to plump them up, then drain before adding.
Be careful not to overmix—just combine until the dough begins to form. Overworking the dough can make your biscuits tough.
4. Incorporate the Butter
Now, it’s time for one of the most crucial elements: the butter.
- Use a stick of butter that has been frozen for about an hour.
- Grate or break it into small chunks and scatter evenly over the dough.
Frozen butter helps create those coveted flaky layers. As it melts in the oven, the water in the butter evaporates, creating steam that lifts and separates the layers of dough.
5. Knead and Fold
Turn the dough out onto a lightly floured surface.
- Gently fold and knead it a few times—just enough to spread the butter pieces throughout the dough without melting them.
This process helps develop structure and incorporates air pockets that lead to a light, layered texture.
6. Roll and Cut
Using a rolling pin, roll the dough out to a thickness between ¼ inch to ⅛ inch, depending on how thick you want your biscuits.
- Use a biscuit cutter (or a round glass) to cut out 6 biscuits.
- Don’t twist the cutter—press straight down. Twisting seals the edges, preventing proper rise.
7. Bake to Golden Perfection
Place your cut biscuits on a parchment-lined baking sheet. Give them a little space to puff up.
- Bake for 7 to 12 minutes, or until the tops are golden brown and the edges are just beginning to crisp.
👀 Watch carefully in the final minutes—every oven is a little different, and these can go from golden to overbaked quickly.
8. Brush with Butter
As soon as they come out of the oven, melt 1 tablespoon of butter and brush it over the tops of the warm biscuits.
This not only enhances the flavor but also helps soften the crust slightly, keeping the biscuits moist.
9. Make the Glaze
While the biscuits cool just slightly (but are still warm), whisk together the glaze ingredients in a small bowl:
- 1 cup powdered sugar
- ⅛ cup water
- 1 teaspoon vanilla extract
- ½ teaspoon lemon juice
This glaze adds a subtle citrusy brightness and a beautiful shine that elevates the presentation.
Drizzle generously over the biscuits while they’re still warm so it soaks in slightly.
Serving Suggestions
These biscuits are best served warm, fresh from the oven, with the glaze just set. Pair them with:
- A steaming mug of coffee or tea
- A scoop of vanilla ice cream for a dessert twist
- A dollop of whipped cream or a spoonful of lemon curd
- Fresh berries or a berry compote on the side
They’re also a lovely addition to brunch menus and can be made ahead for easy entertaining.
Storage Tips
- Room Temperature: Store in an airtight container for up to 2 days.
- Refrigerator: Keep for up to 4 days, though they’re best eaten fresh.
- Freezer: Freeze unglazed biscuits for up to 1 month. Reheat in the oven and glaze just before serving.
Variations and Substitutions
- Try other berries: Raspberries, chopped strawberries, or blackberries also work well.
- Add citrus zest: A teaspoon of lemon or orange zest in the dough enhances the fruity flavor.
- Use buttermilk: Swap the milk for buttermilk for a tangy twist and even more tender texture.
- Dried fruit version: Use dried blueberries, cranberries, or cherries if fresh ones aren’t available.
Final Thoughts
These Sweet Blueberry Biscuits combine the heartwarming simplicity of a classic biscuit with the joyful burst of blueberries and a decadent glaze. They’re easy enough to whip up on a weekend morning but special enough to serve guests. With a flaky texture, tender crumb, and a perfect blend of sweet and tart flavors, they might just become your new go-to recipe for when you’re craving something cozy, fruity, and utterly satisfying.