Absolutely! Here’s a long, detailed, and engaging article written in English (US) style based on Mary Berry’s Victoria Sponge Cake. It includes background, baking tips, ingredient insights, and presentation suggestions—perfect for a blog, newsletter, or home baking guide.
Few cakes hold the charm, elegance, and nostalgic flavor of a Victoria Sponge Cake. This classic British bake—light, buttery, and delicately sweet—is a tea-time favorite that has stood the test of time. Named after Queen Victoria, who reportedly enjoyed a slice with her afternoon tea, this cake represents the very best of simple, homestyle baking.
Today, we’re bringing you a foolproof version inspired by none other than Mary Berry, the beloved British baking icon. Her recipe for Victoria Sponge Cake is delightfully simple yet produces consistently stunning results. With just a handful of pantry staples, you can create a beautiful cake that feels as royal as its name suggests.
Let’s walk through the process, step by step.
Why You’ll Love This Cake
- Timeless Simplicity: With only a few ingredients, the cake focuses on pure flavor and texture.
- Perfect for Any Occasion: From birthdays to brunches to cozy afternoon teas, this cake fits any setting.
- Customizable Filling: Jam, lemon curd, whipped cream—you decide what goes in the middle.
- Beginner-Friendly: Straightforward instructions and reliable results make it a great starter bake.
Ingredients Overview
Here’s everything you’ll need to create this delightful cake:
For the Cake:
- 115g self-raising flour: This flour already contains baking powder, helping the sponge rise beautifully.
- 1 teaspoon baking powder: Added for an extra lift and lightness.
- 115g softened butter: Unsalted is best so you can control the salt level. Leave it out of the fridge to soften.
- 115g golden caster sugar: This fine, pale sugar gives the cake a golden hue and soft crumb.
- 2 large eggs: Provide structure, moisture, and richness.
- 1 teaspoon vanilla extract: Adds subtle warmth and depth to the flavor.
For the Filling & Topping:
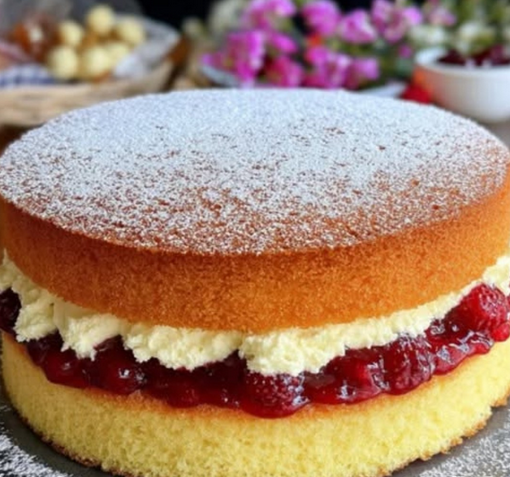
- Jam, lemon curd, or whipped cream: Choose one or mix them—raspberry jam is traditional, but you can get creative.
- Icing sugar: For a final dusting on top; adds elegance without overwhelming sweetness.
Step-by-Step Instructions
Step 1: Preheat and Prep
Start by preheating your oven to 350°F (175°C). Grease two 8-inch round cake pans, and line the bottoms with parchment paper for easy release. Proper prep ensures your cakes come out effortlessly and evenly baked.
Step 2: Cream Butter and Sugar
In a large mixing bowl, cream the softened butter and golden caster sugar until pale and fluffy. This step is crucial—take your time here. The air you incorporate now will help give the sponge its tender, light texture.
Tip: Use a hand mixer or stand mixer for best results, but a wooden spoon and some elbow grease will do the job just fine.
Step 3: Add Eggs and Vanilla
Add the eggs one at a time, beating well after each addition to keep the mixture smooth. Then stir in the vanilla extract.
Note: If the mixture begins to curdle slightly, add a spoonful of the flour to bring it back together.
Step 4: Fold in the Dry Ingredients
In a separate bowl, sift together the self-raising flour and baking powder. Gently fold the flour mixture into the wet ingredients using a spatula or metal spoon. Mix only until combined—overmixing can toughen the sponge.
Tip: Use a light hand while folding to keep the batter airy.
Step 5: Bake the Cakes
Divide the batter evenly between the two prepared pans and smooth the tops with a spatula.
Bake for 20–25 minutes, or until the cakes are golden and spring back when gently pressed. A skewer or toothpick inserted into the center should come out clean.
Step 6: Cool Completely
Let the cakes cool in the pans for about 5 minutes, then carefully turn them out onto a wire rack. Allow them to cool completely before filling.
Assembly and Finishing Touches
Once your cakes are cool, it’s time to assemble.
- Choose your filling: Raspberry jam is traditional, but strawberry jam, lemon curd, or fresh whipped cream all work wonderfully.
- Place one sponge layer on your serving plate, bottom-side up for a flat surface.
- Spread your chosen filling evenly across the top.
- Gently place the second sponge layer on top.
- Finish with a light dusting of icing sugar.
Optional: For extra indulgence, you can add a layer of whipped cream on top of the jam or use both jam and lemon curd for a tangy twist.
Presentation and Serving Suggestions
This cake is best served with a hot cup of tea—preferably Earl Grey or English Breakfast, if you want the true British experience. Cut into generous slices and enjoy it as a dessert or elegant afternoon treat.
Storage: Keep in an airtight container at room temperature for up to 2 days. If filled with cream, refrigerate and consume within 24 hours.
Make Ahead: You can bake the cake layers a day in advance and assemble just before serving.
Final Thoughts: A Classic Worth Mastering
Mary Berry’s Victoria Sponge Cake is more than just a recipe—it’s a celebration of simple ingredients, skilled technique, and timeless taste. Whether you’re baking for a party or treating yourself to a solo tea break, this cake brings a little bit of joy to any occasion.
So channel your inner British baker, preheat that oven, and get ready to fall in love with a true classic. One bite and you’ll understand why this cake has been beloved for generations.