Introduction
There’s something magical about biting into a warm, freshly made donut – the tender crumb, the delicate sweetness, the satisfying texture that store-bought versions simply can’t match. This comprehensive guide will walk you through creating bakery-quality donuts in your own kitchen, from activating the yeast to achieving that perfect golden fry. With just a few basic ingredients and some patience, you’ll discover why homemade donuts are worth the effort and how they can surpass anything you’d find at a donut shop.
Understanding the Ingredients
The Foundation
- 1 cup whole milk (warmed to 110°F/43°C) – creates tenderness
- 2 1/4 tsp active dry yeast – for proper rise and airy texture
- 1/4 cup white sugar – feeds the yeast and adds sweetness
The Structure
- 4 cups all-purpose flour (spooned and leveled) – provides structure
- 1/2 tsp salt – enhances flavor and controls yeast activity
The Richness
- 2 large eggs – adds richness and helps with browning
- 1/2 cup melted butter – creates tender, flavorful dough
Finishing Touches
- Oil for frying (vegetable or peanut oil recommended)
- 1 cup powdered sugar – for classic dusting
Step-by-Step Instructions
1. Activating the Yeast (10 minutes)
- Warm milk to 110°F (43°C) – use a thermometer for accuracy
- Combine warm milk, sugar, and yeast in a large mixing bowl
- Let sit for 5-10 minutes until foamy (proves yeast is active)
2. Creating the Dough (15 minutes active)
- Whisk eggs and melted butter into yeast mixture
- Gradually add 3 cups flour and salt, mixing with a wooden spoon
- Turn onto floured surface and knead in remaining flour
- Knead for 5-7 minutes until smooth and elastic
3. First Rise (1-1.5 hours)
- Place dough in greased bowl, cover with damp towel
- Let rise in warm place until doubled in size
- Test by pressing two fingers in – indentation should remain
4. Shaping the Donuts (20 minutes)
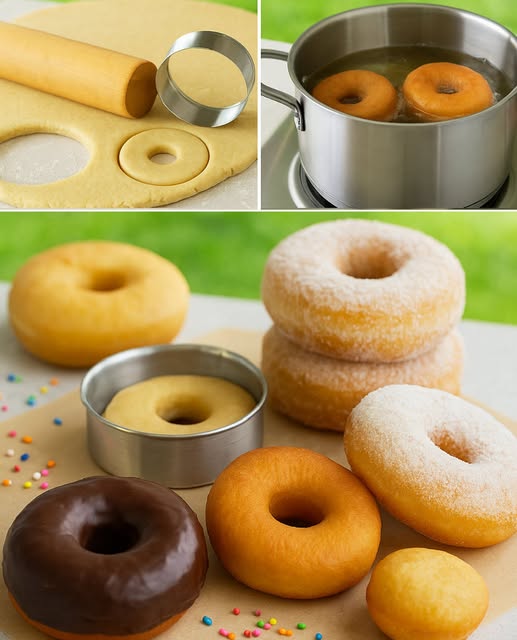
- Punch down risen dough and roll to 1/2-inch thickness
- Cut with 3-inch donut cutter (or two round cutters)
- Place on parchment-lined baking sheets
- Cover and let rise 30-45 minutes until puffy
5. Frying to Perfection (2-3 minutes per batch)
- Heat 2-3 inches oil to 350°F (175°C) in heavy pot
- Carefully add 2-3 donuts at a time (don’t overcrowd)
- Fry 1-1.5 minutes per side until golden brown
- Drain on wire rack over paper towels
6. Finishing (5 minutes)
- While warm, dust with powdered sugar
- For glaze: mix powdered sugar with 2-3 tbsp milk
- Dip tops in glaze or roll in cinnamon sugar
Professional Tips for Donut Success
Temperature Control
- Maintain consistent oil temperature (use thermometer)
- Adjust heat as needed between batches
- Let oil return to 350°F before adding next batch
Dough Handling
- Don’t over-flour the work surface
- Handle risen dough gently to preserve air pockets
- Re-roll scraps only once to prevent toughness
Flavor Variations
- Add 1 tsp vanilla or almond extract to dough
- Mix 1/2 tsp cinnamon into powdered sugar
- Fill with jam or custard using piping bag
Troubleshooting Common Issues
Problem: Dense Texture
- Solution: Ensure proper yeast activation
- Solution: Don’t skip either rise time
Problem: Greasy Donuts
- Solution: Maintain correct oil temperature
- Solution: Don’t overcrowd frying pot
Problem: Pale Color
- Solution: Check oil is hot enough before frying
- Solution: Fry slightly longer if needed
Storage and Serving Suggestions
Best Enjoyed
- Immediately after frying (within 2 hours)
- Reheated briefly in 300°F oven for 3-4 minutes
Storage Methods
- Room temperature (uncovered) for 8 hours
- Refrigerate in airtight container for 2 days
- Freeze unglazed for up to 1 month
Serving Ideas
- Classic: Powdered sugar with coffee
- Decadent: Chocolate glaze with sprinkles
- Seasonal: Apple cider glaze in fall
- Sophisticated: Maple glaze with bacon crumbles
Why Homemade Donuts Are Worth It
- Freshness – Enjoy at peak flavor and texture
- Customization – Create exactly what you crave
- Quality Ingredients – Control what goes in
- Satisfaction – Pride of creating something delicious
- Cost Effective – Makes about 16 donuts for pennies each
Conclusion
Mastering homemade donuts is a rewarding culinary skill that will impress family and friends. While the process takes time, each step – from watching the yeast bloom to seeing the donuts puff in the hot oil – contributes to creating something truly special. These donuts represent the perfect balance of crisp exterior and cloud-like interior, with a freshness that commercial donuts can’t match. Once you’ve experienced the joy of homemade, you may indeed find yourself reaching for the flour instead of your car keys when that donut craving hits. Remember, like any skill, donut-making improves with practice, so don’t be discouraged if your first batch isn’t perfect. The journey to donut mastery is as sweet as the destination.